
MusicMaster Blog
Customizing Your Hour or Sweep Targets Publicado por Dave Tyler en diciembre 12th, 2022
Customizing Your Hour or Sweep Targets
By Dave Tyler
There are all kinds of ways to control the sound of your radio station. Today I want to use a specific Attribute field that I have for “Era”. This station has songs from the 70s to today. I have my library’s songs coded for this and although it has songs from all Eras I want it to lean late 90s-2000s. In my example I want to use the Hour Target rule to nudge MusicMaster to schedule to my preference. When I add the Hour Target rule from my Attribute Field Rules/Era folder, the meter I see goes from 1-9 which is a bit confusing. Mostly because my 1 code is actually the code for my 2020+ songs so this meter goes from 2022+ to 1970s, 1980s, 1990s and 2000s. Out of order and hard to understand if I want to use this rule.
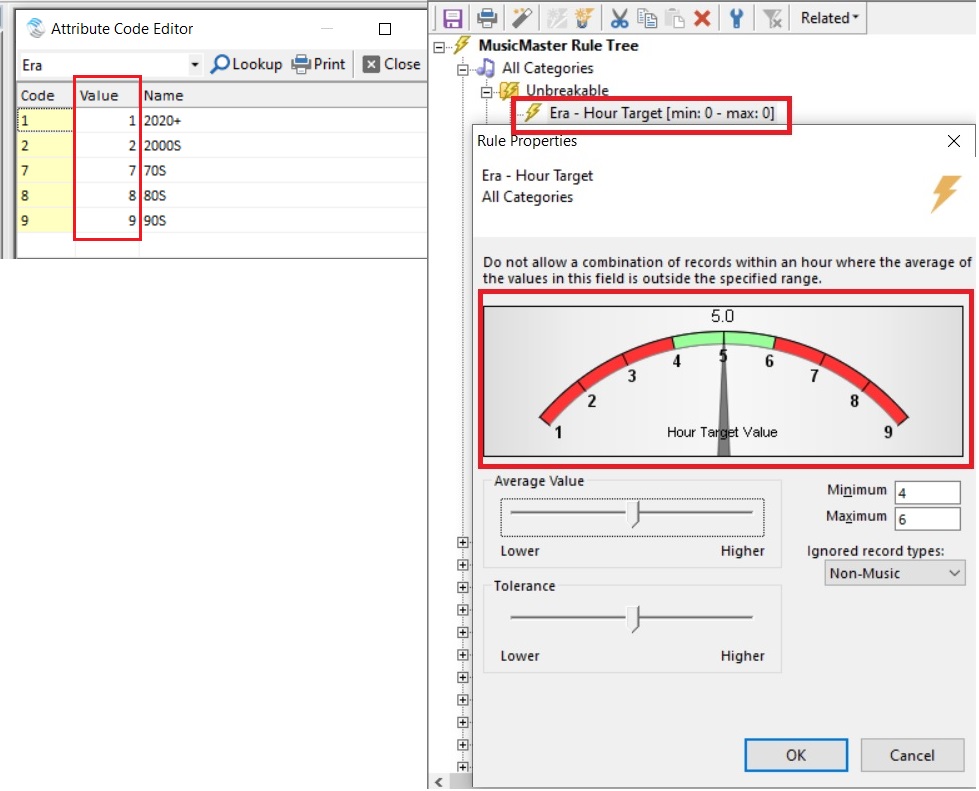
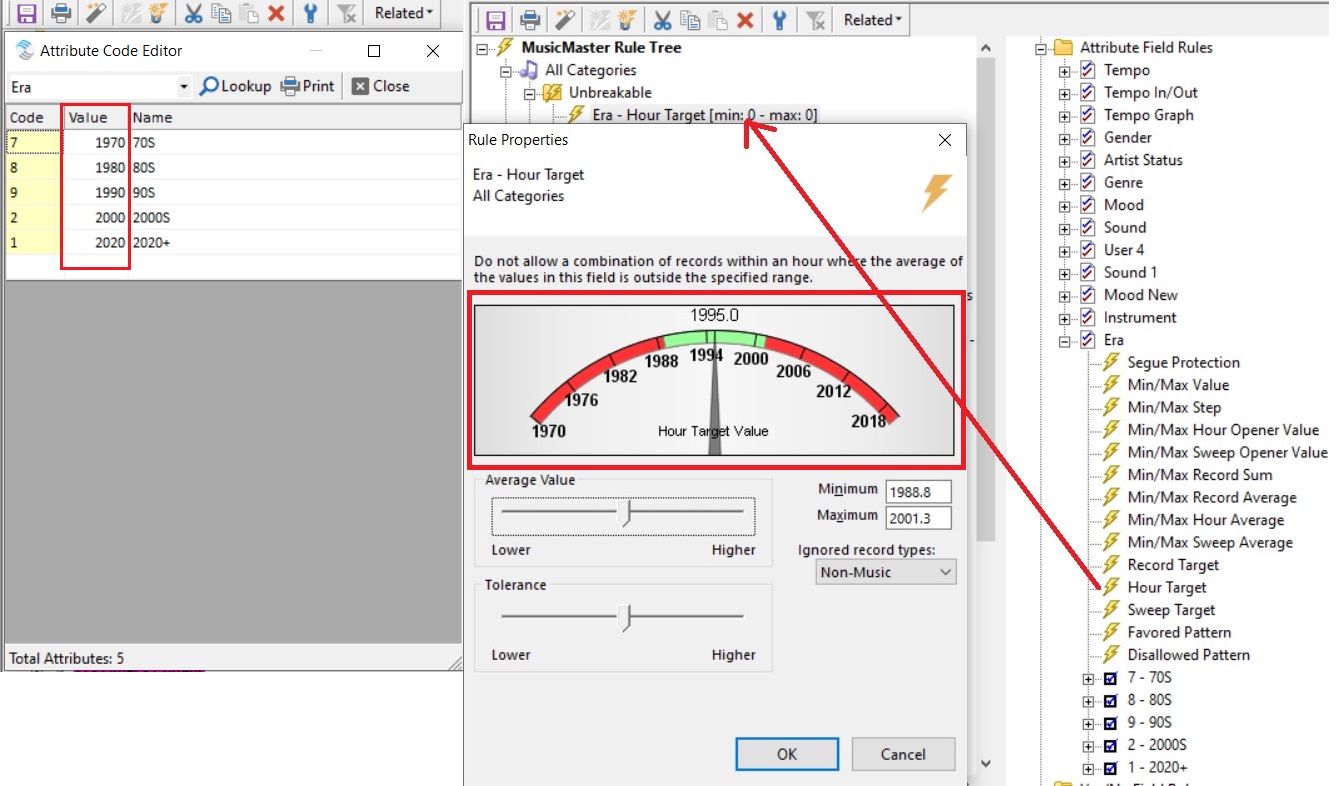
The cause of this is the Value field in the Attribute Code editor for Era. If I change the value to match the Era names then you will see the meter becomes much more understandable and easier to use.
MusicMaster gives you the power to customize just about everything in your database and this is one easy way to get more of the sound you want and a view that makes adjustments even easier.
If you have any questions just contact your dedicated Support rep. We love to help!
Different Query Options For Different Data Types Publicado por Laurie Knapp en noviembre 28th, 2022
Different Query Options For Different Data Types
By Laurie Knapp
MusicMaster has many different query options to help you find specific songs in your library. Beyond the basics, like searching by artist or title, you can find songs based on combinations of their keywords, attributes or other metadata. This is not only helpful when referencing or cleaning up your database but also when building song lists, special programming or finding that perfect song to fill a spot in your log.
Each different database field type (like attribute or numeric) has different Query Filter options available to it. In this article, we’ll look at some of the most common data field types used, and the different ways you can search for information stored in those fields. Knowing the many options that are available will inspire you with more ways to save time and get creative with your queries.
Remember, you can use any combination of these filters or any combination of fields to build complex queries. If you do add more than one search filter, be sure to select whether you want the results to match All or just Any of the search terms. You can also use the Sort Keys at the bottom of the Query box to sort your results by up to three fields.
You can Save your Queries so you can run them again and again to bring up a list of songs that meet those criteria.
Another tool you may want to explore further is the Prompted Query. This allows you to save a query that only contains the Filters but has blanks for the value. That way, each time you run it, you’ll get a simple form where you can fill in different values to search by. More info on Prompted Queries can be found here: https://musicmaster.com/?p=6727
Text Fields
For text or memo type fields, you’re most likely looking to match some text value or phrase. Some examples of data you may store as text are:
- Artist, Title, Album (not keywords)
- Composer, Label or Publisher
- Audio Filename or Hard Drive Location
- URL for Artist Website
- Identifying information like spine or cart number
(A Memo Field is used for longer bits of text, such as notes, lyrics or other descriptive information.)
Your query filter options for these types of fields allow you to search for an exact text match (“equals”) or a partial match (“contains” or “begins with” or “ends with”).
You can also search for the opposite – does not equal, does not contain, etc.
For example, maybe you want to search for all songs by The Eagles but want to exclude any of their live recordings. If you know you wrote “live” somewhere in the title of those recordings, you could run this search.

Note that you can use AutoFill or use the drop down in the value box to pick from a list of your Artists. This way you’ll know for sure whether you wrote them as “Eagles” or “The Eagles”.
Another helpful way to use Queries is for database maintenance. You can find songs that are missing data in a field by selecting the filter option “Is Blank”. (By the way, this applies to more than just Text Fields!)
For example, you could find all songs where you haven’t yet filled in an Audio Filename or the Website URL yet so you can get caught up adding that information.
You can also use “Is Not Blank” to find fields that do have data in them. For example, you could search for all songs where you’ve made notes in the “To Do” memo field and pull up a list of songs that still need work.
Attribute Fields
With attribute queries, you’re usually looking to find songs that are coded with a specific attribute or combination of attributes. Remember, some attribute fields contain just one piece of information (like Attribute-Overall type fields) and some can store more than one value (like Attribute-Multiple, Attribute-Combo or Attribute-In/Out type fields).
If you have fields that hold more than one value, you have to decide what combination of values you want to search for.
For example, you may have Attribute-Multiple codes for the song’s Themes, which includes (among other things) C for Cars and S for Summer.
- If you want to find a song that is either about Cars OR Summer, you’d use “Contains Any of CS” to find either C or S coded songs.
- If you want to find a song that ONLY is about Cars and Summer and nothing else, you’d use “Contains Only CS”.
- If you want to find a song that is about BOTH Cars AND Summer but may also have other themes associated with it as well, you’d use “Contains All of CS”.
- Not only would this find songs that are just coded CS, but it could also find songs that contain other themes, like CDS for Cars, Dancing and Summer
- For a more advanced example: If you want to find a song that is about Cars AND Summer but is not about Breakups (B) OR Heartache (H), then you’d use two layers of filters. “Contains All of CS” and “Does Not Contain Any of BH”

By the way, the above concept also applies to Keywords that have multiple values too. More on Keywords later.
Another common attribute example is Tempo. If you have an Attribute-Overall field for tempo, you only have one value stored, which as you can probably guess, is the overall song tempo.
You can search for an exact match of songs that have a certain overall tempo.
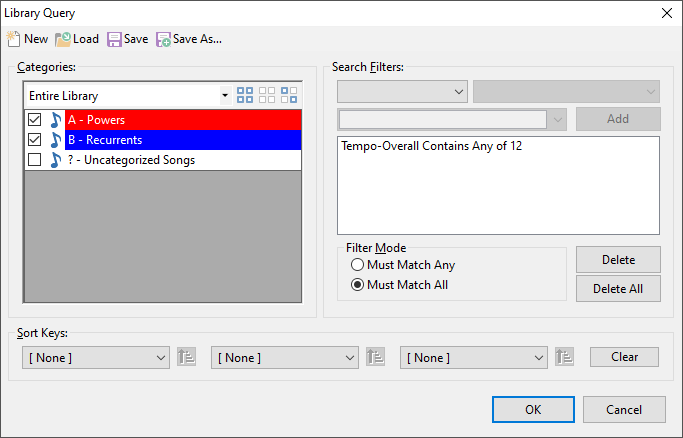
What if you want to find either slow OR medium-slow songs? At first, you might think you’ll have to add two layers: Tempo-Overall Equals 1 and Tempo-Overall Equals 2 and then select “Must Match Any” to find songs that meet either criterion.
But a faster way to do this is to combine the two codes together by using “Contains Any Of 12”!
The Attribute-Overall field only stored one value. But if you have an Attribute-Combo field for tempo, you are storing a three-digit code that represents the intro tempo, the overall tempo and the ending tempo as one value. This could look like “131” or “SMS” for a song that starts and ends slow but overall has a medium tempo.
Here you have more options since there are more values to work with in that field. For example, if you want to find all songs that have a slow intro, you could use the query “Begins With 1”. You also have options for Ends With, Does Not Begin With, and Does Not End With.
You might use this to place a Library Query element in your clocks so that songs coming out of your breaks do not begin with a slow tempo. (More on Library Query elements here: https://musicmaster.com/?p=6653)

Finally, just like in other field types, you can use “Is Blank” or “Is Not Blank” to quickly find all songs that are missing certain attribute codes, or that have been filled in already.
Keyword Fields
Keywords are usually written out as text (versus an abbreviated code), but they have similar properties to Attributes in that you assign one or more to a song. They are different in how they are used by the Rules and Special Sets but they have similar options when it comes to Queries.
The same options noted above can be used to search for a combination of Only, Any and All keywords on a song. Since Keywords are written as text, you can also search for a full or partial match of the text itself.
You’ll note additional options on fields that can hold multiple keywords. This might be used if you have songs with multiple performers or contributing artists. For example, I may have an Artist Keywords field that contains multiple keywords for both the primary artist and anyone who contributed to the track. Some unique queries I can run on this field are:
- Count: Equals, Does Not Equal, Greater/Less Than
- Primary Keyword Equals or Contains
- Contains or Does Not Contain
For example, I can bring up a list of all songs where Drake is the primary artist (first on the list) by using “Primary Keyword Equals Drake”. This wouldn’t bring up any songs where Drake is listed only as a secondary or contributing artist. I could also search for Artist Keywords Contains “Paul Simon” to find a list of both his solo music and his Simon & Garfunkel music.
Another maintenance use is to find all the songs that have multiple artists listed by using Count Greater Than 1.
You can also assign Trivia to keywords the same way you assign trivia to individual Songs. There are additional query options pertaining to Trivia with Keywords to handle this.
For example, you can search for Keywords that either do or don’t have any trivia associated with them. Or you can search by the trivia start or kill date. You can also search within the trivia text itself to get a list of songs where the keyword trivia mentions something specific like a concert or birthday.
Date Fields
Dates are stored with month, day, and year information. MusicMaster has many query options help you narrow down a date range, both in relation to the calendar itself and the days you have scheduled. Some examples are:
- Matches Current Date
- Within Last/Next X Days
- Within Current Week/Month
- Within Last/Next X Scheduled Days
- Matches Last Scheduled Date/Week/Month
- Month/Day/Year Matches
- Equals
Some Internal (built-in) fields accept dates, such as Add Date or Move Date, which indicate when a song was added to the library or when it was moved into its category. For example, you might want to find all the songs that you added to your library last year.
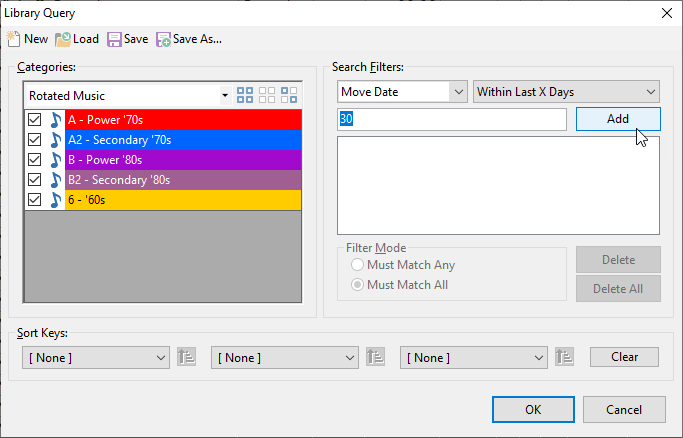
Or, you could find songs that were moved to a new category within the last 30 days, like this:
Another built-in example is Start or End Day/Hour. These are used to determine when a song can start to be considered for scheduling, and when it’s no longer eligible for consideration.
For example, if you have set a Start Day set, you might want to pull up a list of songs that will be debuting in the upcoming week. This query would look like “Start Day/Hour Within Next 7 Days”.
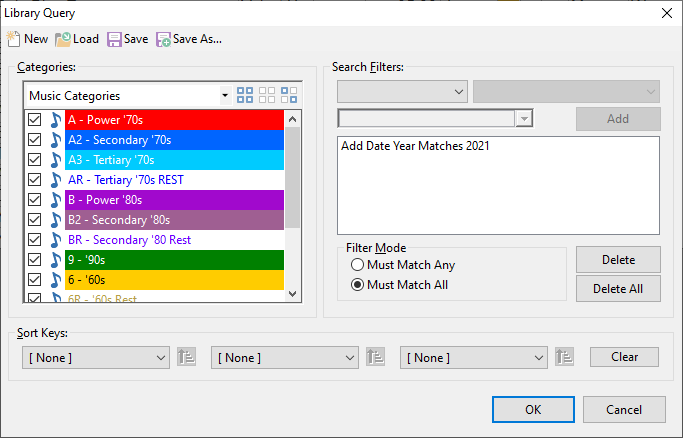
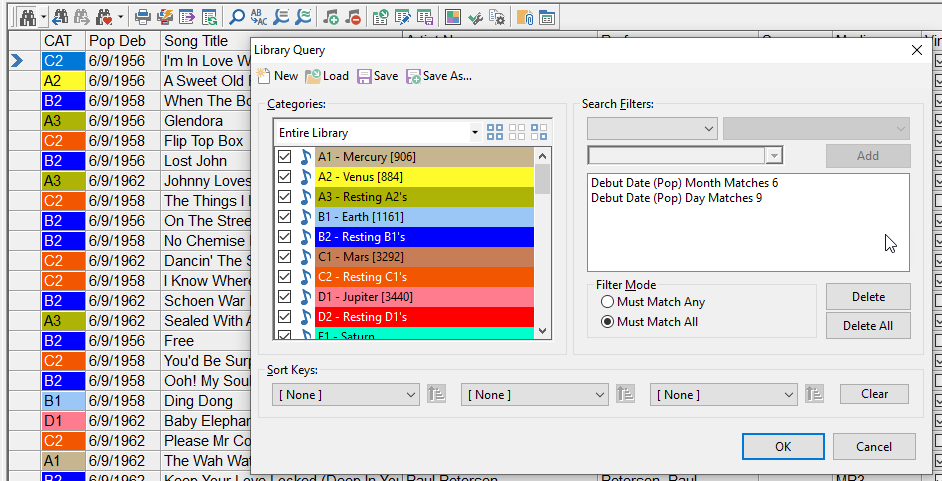
You might also use dates to store chart or research information, such as when a particular research test was performed or on what date a song was released or debuted on the charts. For example, you could pull up a list of songs that first charted on today’s date (June 9), but from any year.
Numeric Fields
These types of fields store numbers of varying kinds, such as the year a song was released, chart positions or research scores.
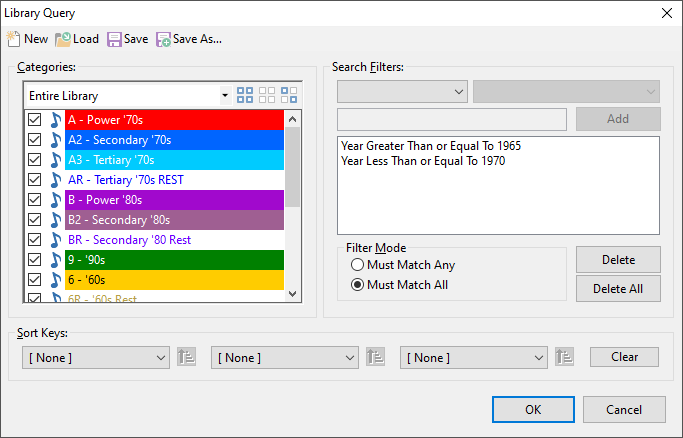
As you might expect, these types of fields have query filters that are mathematical, such as “equal to”, “greater than” or “less than or equal to.” So for an easy example, here’s how you might find songs that were released from 1965 through 1970.
You can also use the “Is Blank” and “Is Not Blank” to find songs that do or do not have values in this field. One example for this would be if you have fields for the Chart Position or Research Score. You could use this query with “Is Not Blank” to find all songs that have any value for chart position, which essentially means they charted. Or you could use “Is Blank” to find all the songs that you haven’t added research scores for yet.
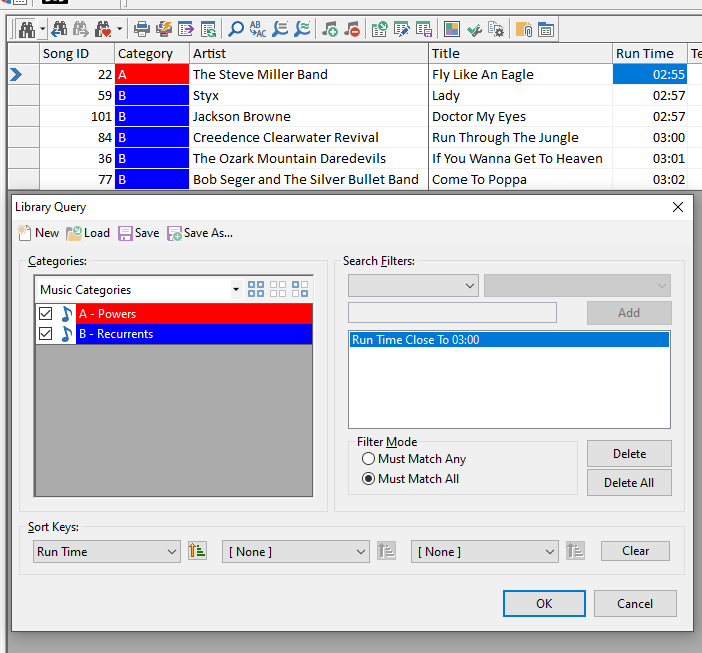
Runtime is an Internal field but behaves like a numeric field. You can use filters like equal, greater than or less than. An example query would be to find all songs that are less than 3:00 in runtime.
There’s also another interesting option available for Runtime called “Close To” and “Is Not Close To”. This allows you to get a fuzzier match to that target runtime, by finding matches within a window of time around it. The default is 10 seconds, but you can change it in Tools > Options > Additional Properties under the Library section. In the Close To box, fill in the number of you want as a search window around the value you enter.
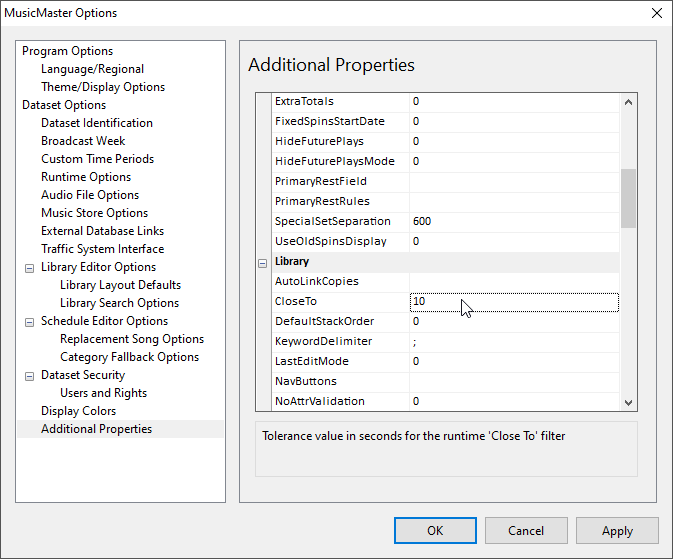
By the way, 10 seconds means 5 seconds on either side of the value you enter. So in the example above, if you searched for run times “close to 03:00” you’d get songs ranging from 2:55 to 3:05.
Other Internal Fields
There are some additional options available for internal fields. For example, you can find songs that have any Dayparting or Packeting on them by using the query filter “Exists”.
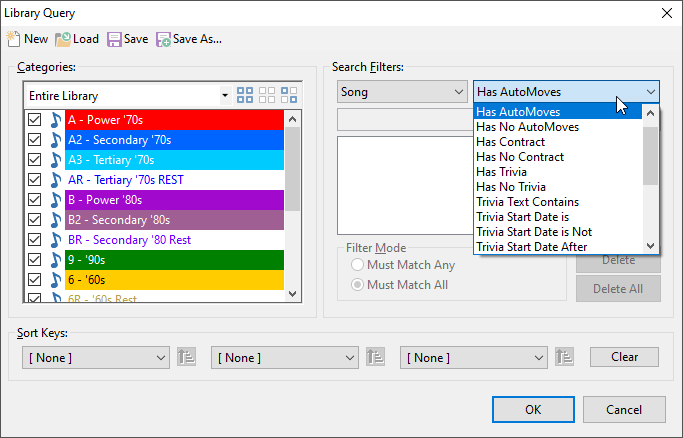
One useful internal field is Song. As you might imagine, this is a reference to the song itself, independent of any metadata you have on it. Many things in MusicMaster relate to the song as a whole, including a subset of rules (Song/History rules) as well as things like Airplay Contracts, Trivia and Auto Moves (when a song is scheduled to move to a new category). There are Query Filter options that refer to these things, as pictured below.
More on Airplay Contracts: https://musicmaster.com/?p=7584
Video on AutoMoves: https://youtu.be/J7jZcfx3IfY
Conclusion
As you can see, there are many creative ways you can use queries to find the songs you’re looking for, whether you’re doing maintenance on your database or putting together some special programming. As you build your database, think about the kinds of fields you may want to add in order to store information that you’ll later put to work in queries!
If you have any questions, feel free to contact your MusicMaster Scheduling Consultant.
Hour and Sweep Opener Separation Rules Publicado por Paul Ziino en noviembre 14th, 2022
Hour and Sweep Opener Separation Rules
By Paul Ziino
A customer called and said, “my announcer complains when he has the same song coming out of his commercial break twice in an air shift. Any way to prevent that?” Starting in MMPro version 8.0.6 you can!
You will find Sweep Opener Separation in your Available Rule Types under Song/History Rules. Make this an active rule and you can tell MusicMaster to not play that song coming out of a sweep marker either for a specified amount of time or for the rest of the shift.
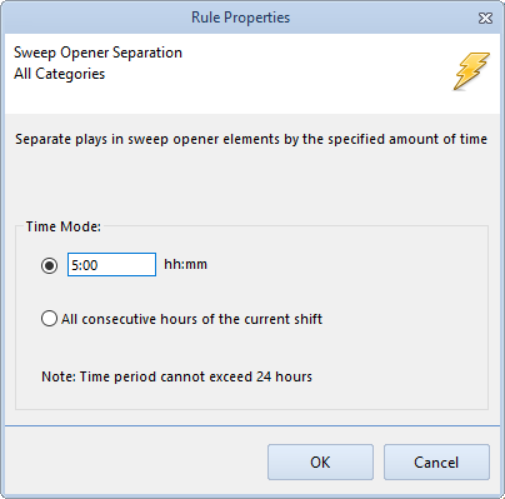
As displayed, we prevent that song from playing after a sweep marker element for the next five hours. If you’re only concerned about the song playing out of a sweep marker for a shift (as set in Dataset/Schedule/Shift Editor) then you would select that option.
There’s also a rule that does the same thing but coming out of the top of the hour. You’ll find Hour Opener Separation also under Song/History Rules. Like the Sweep Opener Separation rule, you can either dictate an amount of time or have it reset based on shift.
That same customer asked a follow up. “We’re classic rock and the announcer doesn’t want to talk about Pink Floyd coming out of a commercial break twice in his shift.” We’ve made that a possibility. too. Under Keyword Field Rules you’ll find Hour Opener and Sweep Opener Separation rules. They work just like the Song rules, except they’re based on a keyword. So long as all the songs by Pink Floyd share the same artist keyword, we’re able to prevent that keyword from playing out of a second commercial break (sweep marker) during the shift.

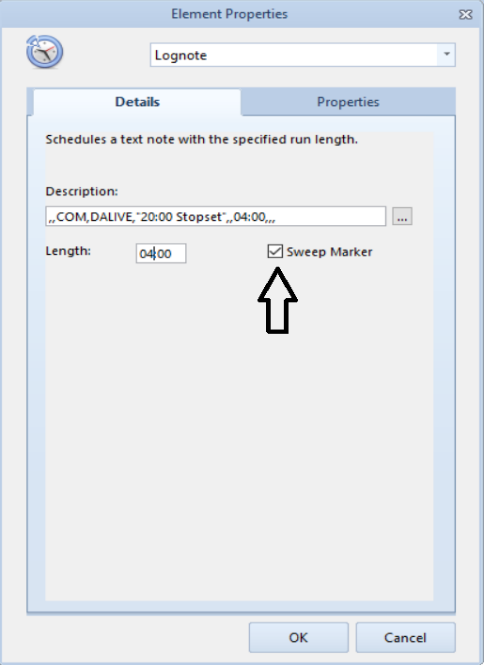
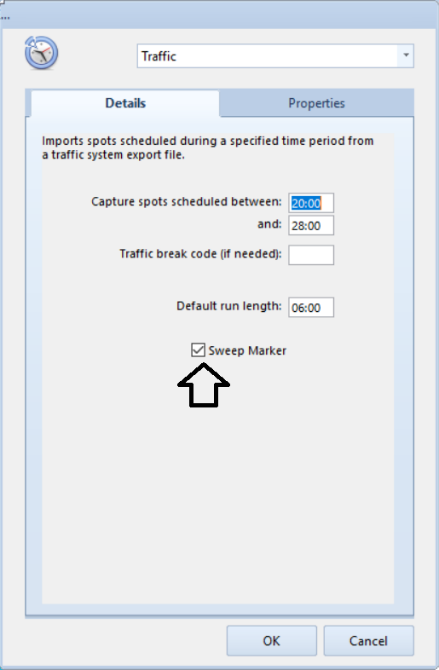
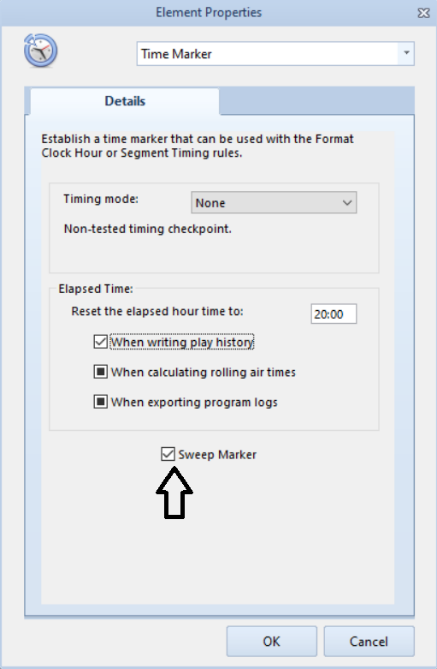
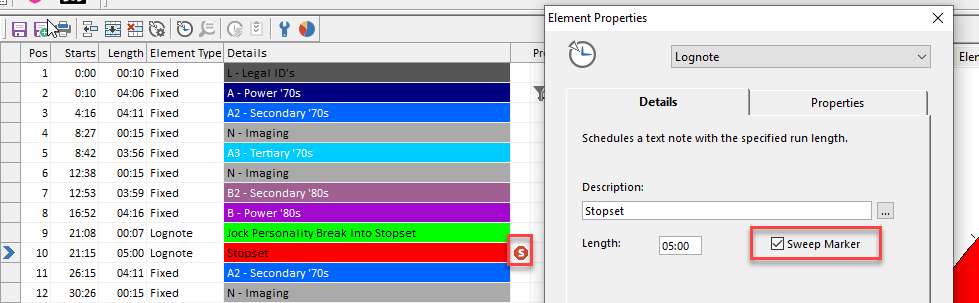
For the Sweep Opener rules to work, you must use Sweep Markers in your clocks. These can be set on lognotes, traffic merges or timing elements by checking the Sweep Marker box for that position in the clock.
Need a hand with anything MusicMaster? Just call your friendly MusicMaster Scheduling Consultant!
Getting More out of your Clocks Publicado por Chris Hulsether en octubre 31st, 2022
Getting More out of your Clocks
By Chris Hulsether
In today’s world, Program Directors and Music Directors wear so many hats that they want to be able to make changes and decisions as quickly as possible when it comes to music scheduling strategy. This is why MusicMaster is the best music scheduler in the world, because we have the flexibility to give you what you want to make the best choices possible. Let’s discuss some of those choices that revolve around your clocks.
I am a big fan of colors with my MusicMaster. It allows me to quickly see what my important categories or elements are in a clock. When I look at a clock or the pie chart the important elements (Music) stick out. I can now make better decisions when I build my clocks. I like to have my Music Categories to be colorful and my Imaging (Sweepers and Jingles) to be different, less colorful, to let my music categories pop. This gives me a better visual of what is happening in my hour.
You have been able to change the colors in each category for a while but did you know you can create color themes?
You have the ability to color all of your categories at once with different colors. You can color just your Music Categories or just your Non-Music Categories or have one theme for Music and another theme for the Non-Music.
You can get to the Category Editor a couple of ways. You can go to Dataset, Library and Categories or in your InfoBar right click on the Categories tab and select Category Editor from the context menu.

Once you have the Category Editor up, click on the Colors button.
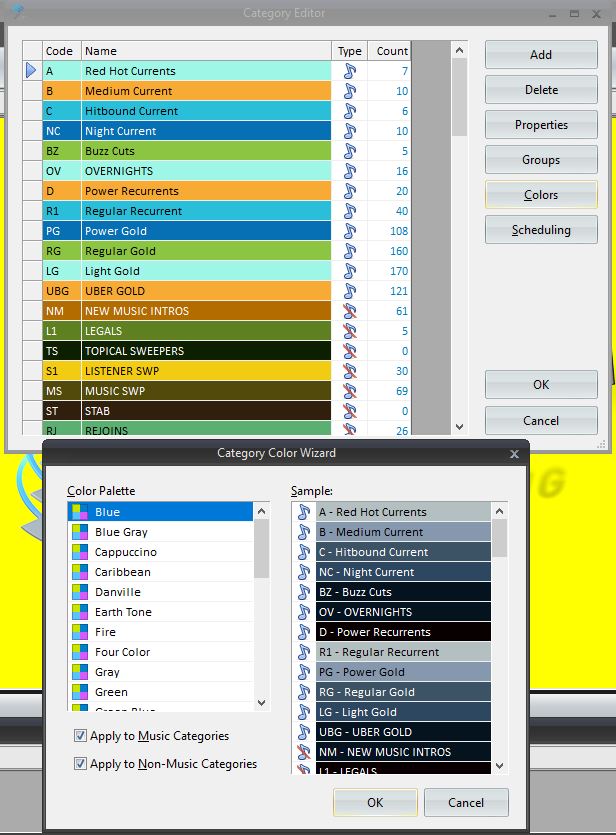
Choose from one of the many different Color Palettes, then check the boxes you want the Color Palette to apply to. This is where you can have the Music Categories as one theme and the Non-music a different theme or have all categories, Music and Non-Music all share the same theme. Click OK and your categories will save with that color theme.
Once you have done this you will really see how your categories will pop in your clocks.

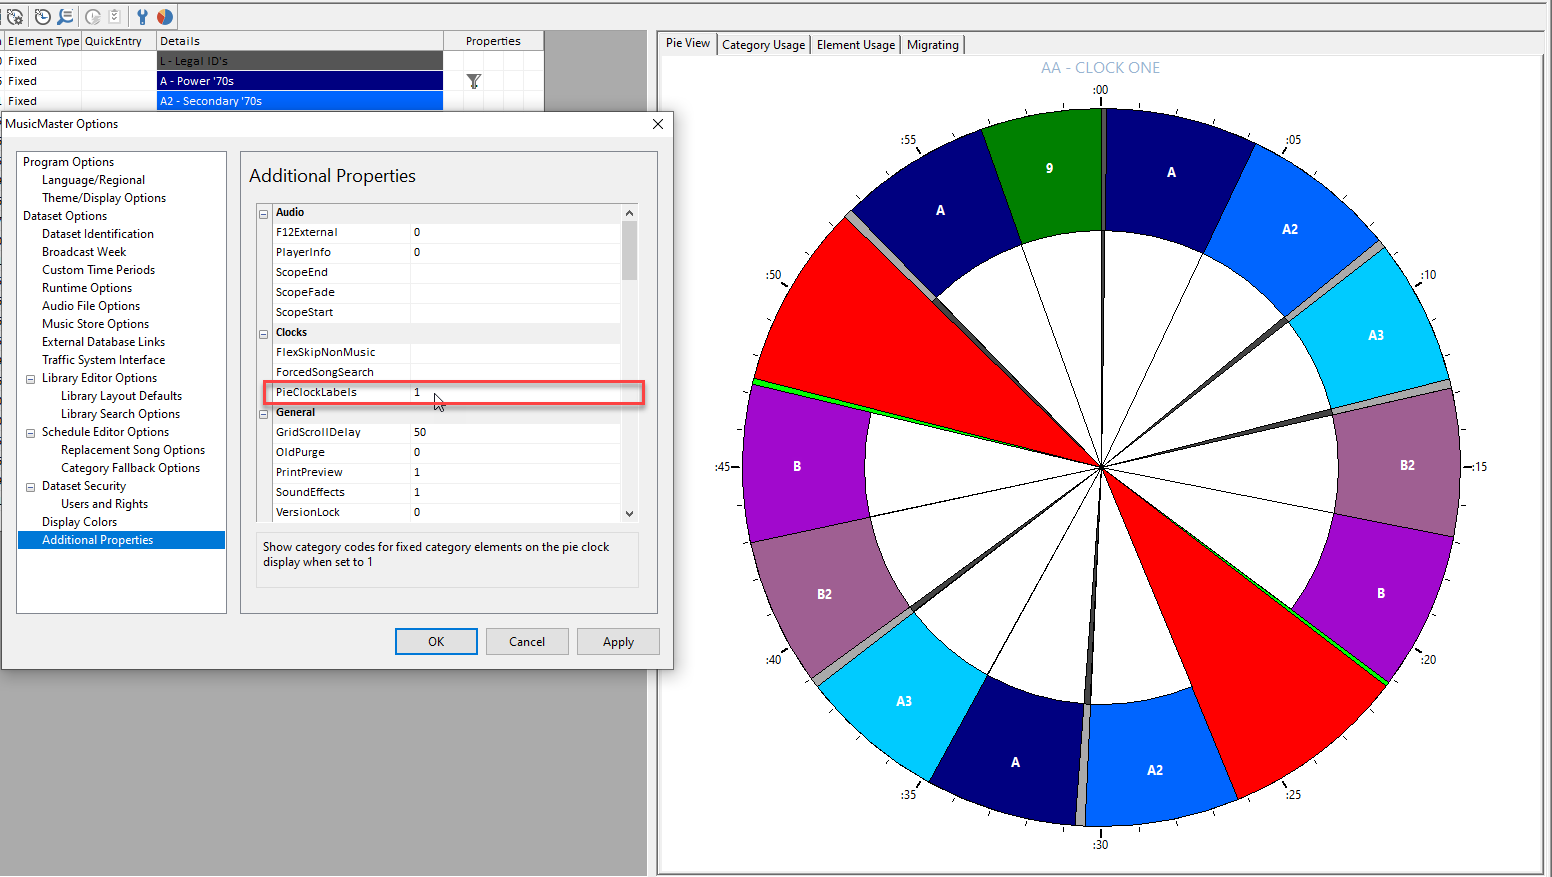
When you look at the Pie View (Click the small Pie Chart Icon to view this) You can see that color theme when you view the full hour.
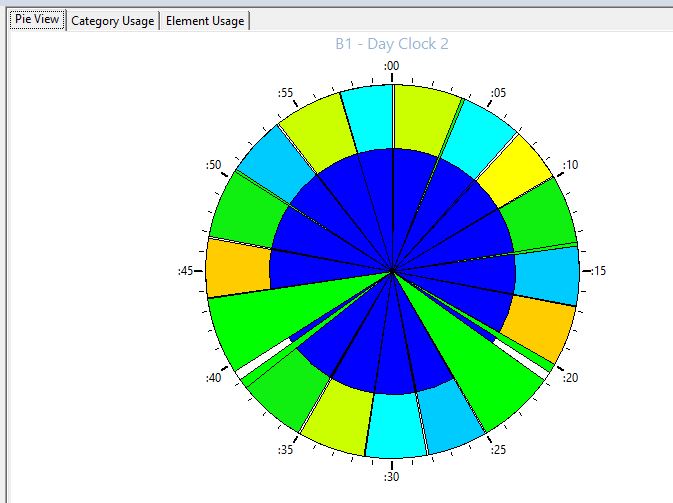
Let’s take it one more step, if you want to label your categories within your Pie Chart, you can add the Category Code to see what category plays in each spot on the pie chart.

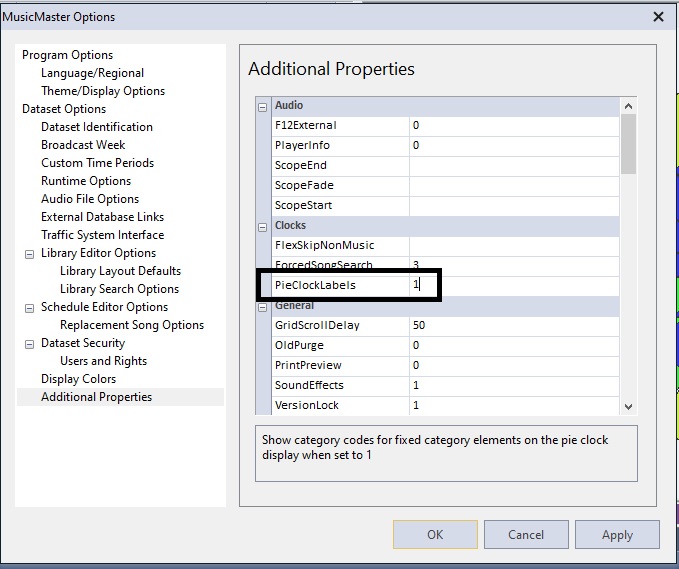
To add the Category Code go to Tools, Options, Additional Properties. Find the clocks section and the PieClockLabels. Change the 0 to a 1, click apply and OK. Reopen your clock.
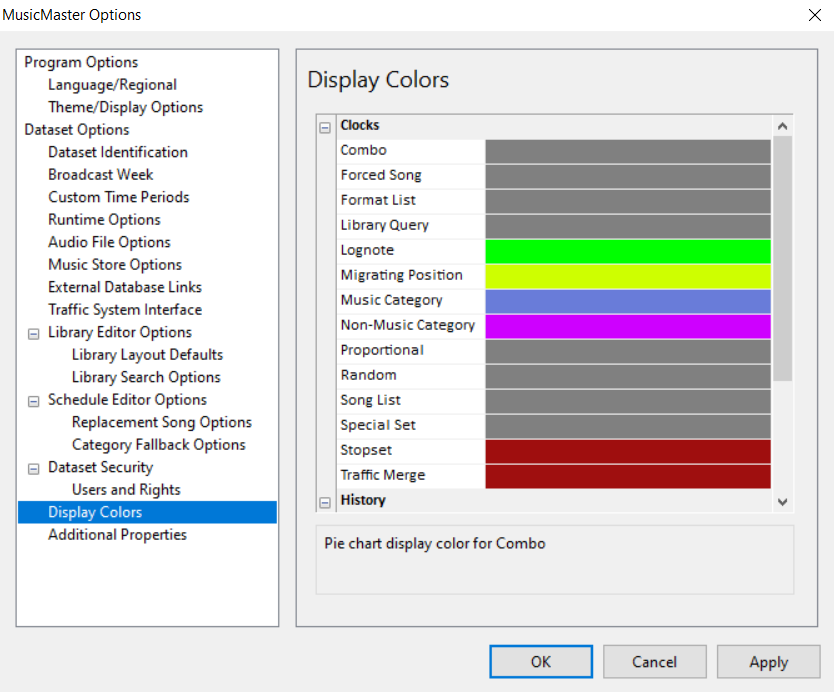
Stay in Tools, Options, Additional Properties and also select Display Colors. Here you will be able color the specific clock element. In the above pie view clock display notice that the inner circle is blue on many elements. This is where you set that. You can set all the Music to one color (like I did here with blue) or even set specific clock elements.
Now that you have your colors set, here are a few more options in Clocks that you may find helpful.
When you are building clocks, you may know about the Category Usage tab and how it can help you count how many categories you have set up in that clock. If you use Migrating positions the Migrating tab has the Migrating Wizard to help you use the Migrating elements work within your clock. Learn more about that feature in this blog https://musicmaster.com/?p=8220
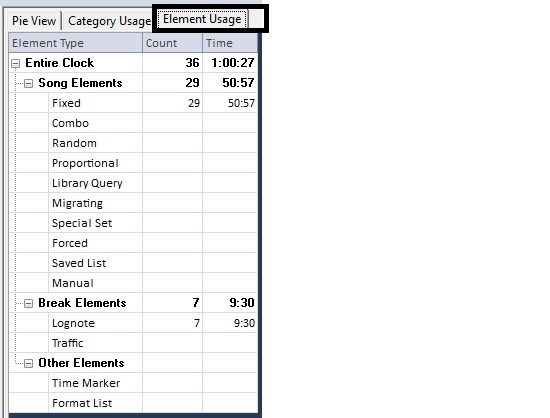
One more tab you can checkout is the Element Usage Tab. This lets you quickly view how many Fixed, Forced, Migrating, etc. elements you have in your clock. This will also list how many lognotes and time markers you have. You will also see the estimated time that is expected to fill in the hour, allowing you can see if the hour has enough music to fill the hour and to make sure you don’t over schedule the hour.
From adjusting your colors to using the additional tabs, there is much you can do in Clocks to make things easy to understand and help you pinpoint the information you need.
If you have questions about these functions in your Clocks, please contact your MusicMaster Scheduling Consultant.
MusicMaster Pro 8.0.7 Available Publicado por Scott Wirt en octubre 28th, 2022
MusicMaster PRO 8.0.7 is now available to you under Help, Check for Update. Changes include:
Corrected some data refresh issues in Library Maintenance where row colors were not displayed properly and where the song counts that can be shown in the InfoBar were not always immediately updated.
Applied some performance improvements in Library Maintenance, particularly to cases where categories were changed on songs. This had the greatest impact when using a SQL database.
Several changes have been made to improve the translation of text displayed in the software to other languages including fixing some phrases that were always shown in English and filling in some missing translations, particularly for Spanish.
You can find the full list of changes under Help, Release notes. Contact your MusicMaster Scheduling Consultant with any questions.
A Golden Future Publicado por Brian Wheeler en octubre 17th, 2022
A Golden Future
By Brian Wheeler
 What’s happening with gold these days? As a person who grew up with music that is now considered ‘oldies’ by most standards, I’m pleased to see music from my formative years enjoy a resurgence in popularity. For me, these songs never stopped being relevant. Yeah, I know how it goes. Newer generations hear you mumbling about the music from your day and you hear “that’s nice, Grandpa…let’s get you to bed”.
But wait! What is this I see? Kate Bush enjoying a renaissance thanks to an appearance on Stranger Things? Even for fans of alternative music back in the day, Kate was never the darling she is right now. I, for one, think IT’S ABOUT TIME. The same phenomenon caused a spike in interest after Metallica’s Master of Puppets was used in another pivotal scene in the same popular show. A whole new generation of fans have been baptized with a simple and apt placement of a song. That’s brilliant placement of some great music.
Is an appearance on a hot television show the sole reason for the comeback of ‘vintage’ music? Evidence says otherwise. According to an article published in The Atlantic , a study showed that ‘Old songs’ now represent 70 percent of the U.S. music market. Other factors also come into play. Large libraries are getting sold to the highest bidder for tens, sometimes hundreds of millions of dollars. That music then becomes available for use in soundtracks, commercials and other modes of consumption. Savvy DJs also use gold cuts in their presentations, bolstered by the knowledge that these songs filled dance floors for decades. Let’s face it: we all know a good song or sample can go a long way. I recently attended a sold-out show at First Avenue in Minneapolis that was brimming with twenty-somethings. Whitney Houston’s “I Wanna Dance With Somebody” began playing over the system prior to the headliner and the floor quickly became a singalong as the awaiting crowd bounced in unison. That song is THIRTY-FIVE YEARS OLD. Yet, it somehow still sounded fresh.

There is something to be said for good music being timeless music. I truly believe quality and not always popularity has a lot to do with songs that are timeless or at least timely.
What can we learn from this? I think a couple lessons can be learned. I believe presentation makes a big difference. Sure, good music sells itself, but an enthusiastic and informative jock that knows how to push that button and pique the listener’s interest surely can’t hurt. I also think finding a way to showcase your format and acknowledging the depth can pay dividends as well. Program Director Garett Michaels of 91X in San Diego recently embraced the station’s four decades of deep alternative roots during an epic A to Z marathon presentation and had a very positive response. In fact, the response was so positive that the station re-positioned their programming to celebrate that rich heritage and colorful tapestry that has graced their airwaves since 1983.
Can celebrating our roots be the ticket to a rich future? Time will tell. It can no longer be ignored that the music that ushered us through our youth and adulthood is now striking a chord with a whole new generation of listeners. Keep sharing the gold, there’s plenty to go around.
It’s About Time: Min Max Step Rule and Hour Target Rule for Song Year Publicado por Laurie Knapp en octubre 3rd, 2022
It’s About Time: Min Max Step Rule and Hour Target Rule for Song Year
By Laurie Knapp
How do you control the balance and flow of musical eras on your station? Some people may use categories and clocks to position songs by era, while others might assign time periods as an attribute and then use rules to control their flow.
However, there are also a number of interesting rules you can use with the Song Year if you have it stored in a numeric field. MusicMaster’s numeric rules work mathematically with the values in the field, allowing you to do things like set things like the minimum, maximum, sum, or average value over time.
In this blog, we’ll look at two examples: the Min Max Step Rule and Hour Target.
Question 1: I want to control the flow of my music so that back-to-back songs are at least 5 years apart, but no more than 10 years apart.
Both of these things can be accomplished using the same rule: The Min/Max Step.
The “step” the rule name refers to the difference in the Numeric year value for each song. So the step between 1975 and 1980 would be five. (Note that when using this type of rule with an Attribute field, the “step” will refer to the difference in values you have set in the Attribute Code Editor.)
When you open the rule, you’ll see you can fill in the Min and the Max step. If you don’t want to set a Min or Max, you can leave the value set to the default of 0. In this case, I want to make use of both bounds, so I’ll set things up as follows:
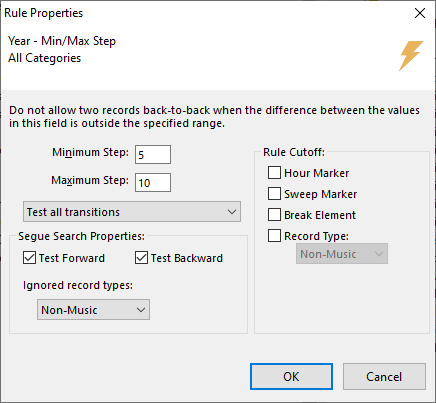
Notice under the next dropdown, I’ve selected Test All Transitions. Alternatively, I could set it to look at the upward step only, or the downward step only. To understand what all these options mean, look at this example:
Scheduled Song 1: 1980
Testing Next Song 2: 1977
Song 1 and 2 are only three years apart, which is outside my acceptable bounds for the minimum step. If I had “Test All Transitions” on, Song 2 would not be able to play.
However, if I were to select “Test upward step only” then Song 2 would pass the rule, because MusicMaster will only be testing songs that are a step above the previous song. In order words, Song 2 would have to be between 1985 to 1990 (within 5-10 years later). But if the song being tested is from any time earlier than 1980, the rule won’t apply.
The same concept works in reverse for “downward step only”.
Typically, you’d want to use the “Test All Transitions” option but in some situations, you might want to have different minimum or maximum steps depending on if you’re looking in one direction or the other. For example, you might find that you’d prefer a stricter or more lenient rule when looking into the past versus the future.
To accomplish this, you’d set two separate Min Max Step rules with different settings. One would apply to the “upward step only” and one would apply to the “downward step only”, as follows:

Looking back at the Rule Settings, the next option you’ll see is the “Segue Search Properties” checkboxes. I’ve checked both on because I want MusicMaster to look both forward and backwards in the schedule when determining if that minimum or maximum step has been met. Since my hour doesn’t get scheduled in chronological order, I want to be sure it’s comparing songs that have already been scheduled directly before and ahead of the current song position.
I also want MusicMaster to compare consecutive songs even if they are on the other side of an hour, sweep marker, break, or piece of imaging. This means I would not check on any of the Rule Cutoff options on the right. If I did want to use any of these options, it would just mean the rule gets reset at either of these points, so it wouldn’t matter if the previous song was outside the minimum or maximum step range.
Finally, I’ve excluded my Non-Music, so their years don’t skew the results.
Now when I look through my schedule, I can see that there’s never a gap of fewer than 5 years between songs in any direction and also never a leap of more than 10 years in any direction.
Question 2: I want the average year in each hour to be somewhere around 1980, give or take 5 years.
The rule you’d want to use for this is called the Hour Target rule.
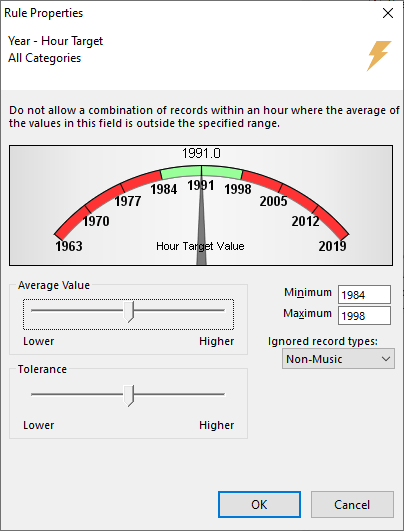
The gauge helps you visualize the years you are targeting. The values on the gauge are derived from the range of values you have set in that field for your songs, from lowest to highest value.
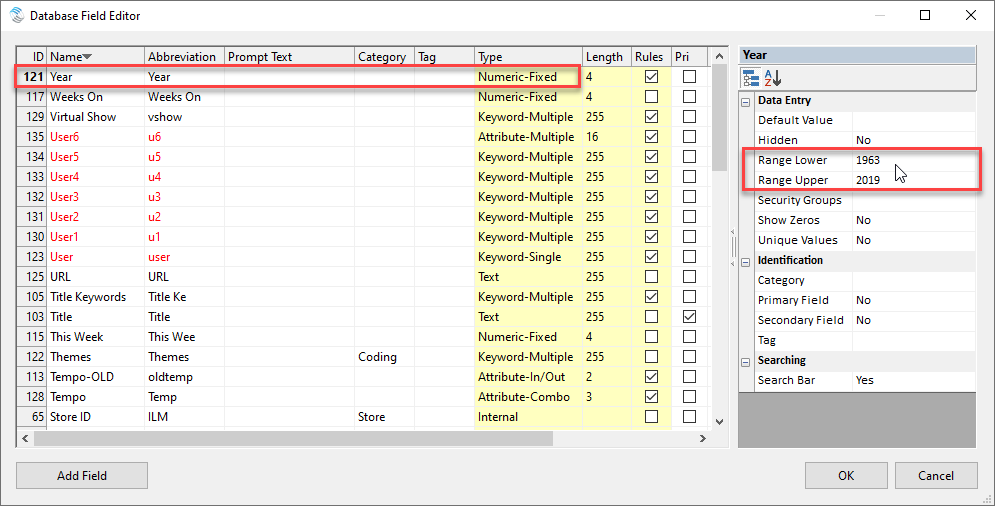
Important note! Before using this rule with a Numeric Field, you have to set an upper and lower range in the Database Field Editor. This rule is also available for Attribute fields, but here, MusicMaster uses the values that are set in the Attribute Code Editor.
To figure out the lowest and highest year you have for the songs in your library, choose all the categories you plan to use and click the Year header to sort from lowest to highest. The first entry has your lowest year. Now click the header again to sort from highest to lowest.
Next, go into Dataset > Library > Fields and find your Year field. You can also sort this list by clicking on the header. In the section on the right, type in the lowest year into Lower Bound and the highest year into Upper Bound. (Remember if you add new songs to your library that come before or after these years, you’ll want to adjust the bounds).
Back in the Rule Settings, note that as you adjust the pointer, you can see the targeted year change. With the second slider, you can also decrease or increase the tolerance to make the target range wider or narrower. You can also use your arrow keys to move the slider. Don’t worry about any decimal values. Since we’re working within broad averages, the range can be a little fuzzy.
So for example, if I want each hour to have an average song year of 1980, give or take 5 years on either side, I’ll adjust my hour target to somewhere around 1980 and adjust the tolerance until its plus and minus 5 years, or roughly 1975 to 1985.
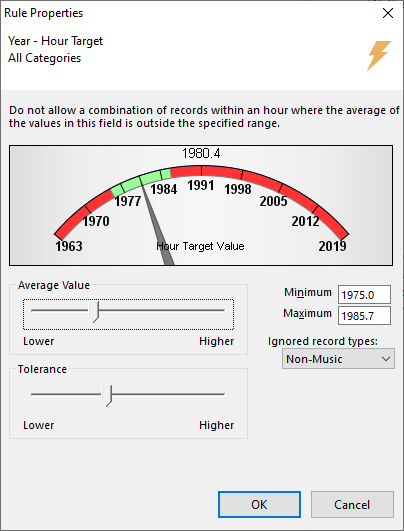
Now, MusicMaster will try to schedule songs in such a way that the average across the hour is somewhere between 1975 and 1985.
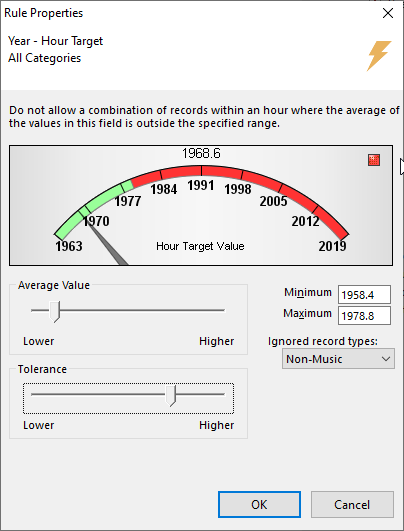
Notice what happens if I move the slider closer to the edge and increase my tolerance. Now, the target window includes years that aren’t even in my database! A little red square appears as a warning. This just means you should adjust the gauge to make more sense for your data.
It’s important to note that the range of 1975-1985 does not refer to the song years that are allowed to schedule. Rather, it’s the acceptable range for the average of all the songs in the hour. This means roughly an equal spread of songs that also come before 1975 and after 1985.
Min/Max Hour Average
If you’re interested, there’s an earlier version of this rule called the Min/Max Hour Average. It’s the same rule, but with less options. Rather than use a target slider or tolerances, you simply type in the range of acceptable averages.
So remember, when I used the Hour Target rule, my target was 1980 but I was okay with five years on either side, in other words, an average of 1975-1985? If I were using the Min/Max Hour Average Rule, I would enter 1975 as the Min and 1985 as the Max. I also would have the same option to exclude Non-Music, but no Rule Cutoff choices.
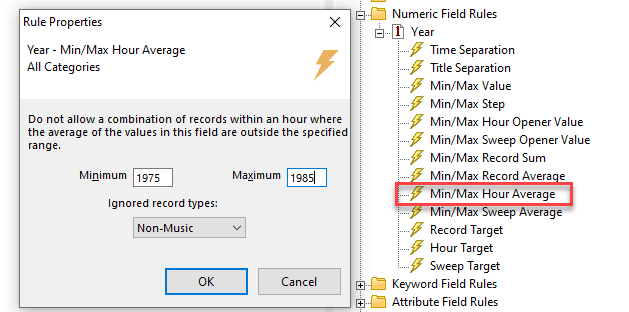
You can use one or the other of these rules, it’s up to you. Just don’t use both!
Dayparting Considerations
As you think about the overall flow of eras across your station, you might also want to set different targets or min max steps at different times or day or different days of the week. To do this, you would use Rule Groups that have Time Restriction Filters set. You can then apply different variations of the Hour Target or Min Max Step rules within each Rule Group.

Library and Category Considerations
A general rule of thumb for rules is to make sure that the settings make sense within the context of your library.
For example, if you play a wide variety of music from the 60s through the 2000s, your step and target settings should be wide enough to accommodate a larger range of values.
That being said, you might also want to exclude certain categories from being tested by those rules. For example, most of my music comes from the 1970s to 1980s, but I have a few smaller categories containing 90s and 2000s music that I sprinkle in less often.
If I set my Hour Target or Min Max step narrowly to keep all my songs within the range of the 70s to 80s, those later category songs are going to have a hard time fitting in. If I broaden my ranges to include the 90s and 2000s too, then it’ll skew what I’m trying to accomplish with the vast majority of the music I play.
One way to remedy this is to only use the rule on the 70s-80s categories. The quickest way to do this is to create a Rule Group in the All Category folder that excludes the categories you don’t want to be affected by this rule. You can do this with a Category Filter set to Does Not Match the selected categories.
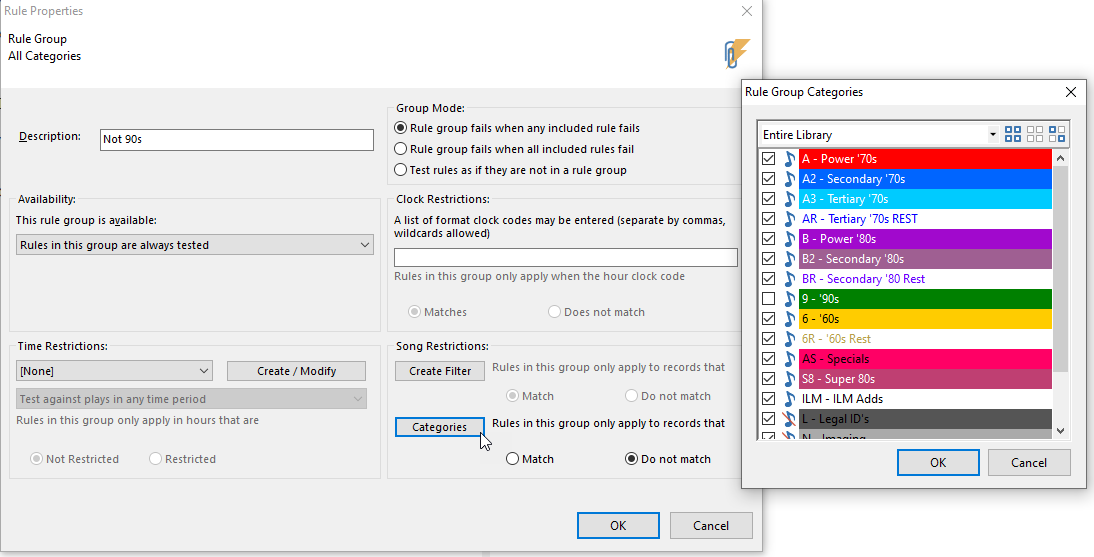
Now a 90s song can freely play next to a song from 1970, even if the Max Step was set to 10.
Keep in mind, the reverse is not true. Since the rule still applies to my 70s categories, a song from 1970 will be unable to play next to a song from 1990 that has already been scheduled.
This is where you have to think about Schedule Pass Order. To avoid this, I’d need to make sure my 90s music is scheduled after my other categories. That way, the 70s and 80s music can live wherever it needs to, even if a 90s song later moves in next door.
You may also choose to only use these rules for your non-priority categories, which schedule after your priority categories. That way, your priority songs can lay down first without as many restrictions on them. Then when you fill in the rest of your music around it, MusicMaster will work with those songs to try and achieve the target year you’ve set for the hour.
Conclusion
These are just two examples of rules you can use with song year, but it’s worth taking a look at all of the Numeric field rules available in MusicMaster and think about how you might use them creatively.
Remember, numeric fields are also useful for things like chart positions and research data. For example, you could set an Optimum Goal for your minimum burn score. That way, in a tie breaker between several perfect songs, MusicMaster will favor the song with the least burnout!
For more ideas, feel free to get in touch with your MusicMaster Scheduling Consultant and pick their brain about what you’re trying to accomplish!
A-to-Z Weekend Publicado por Brian Wheeler en septiembre 19th, 2022
A-to-Z Weekend
By Brian Wheeler
Creating an A-to-Z weekend for your audience can be a fun way to celebrate your library and give your sales staff an opportunity to sell an exciting and fun programming event. Best of all, you have all the tools necessary to create this event with your music library and MusicMaster.
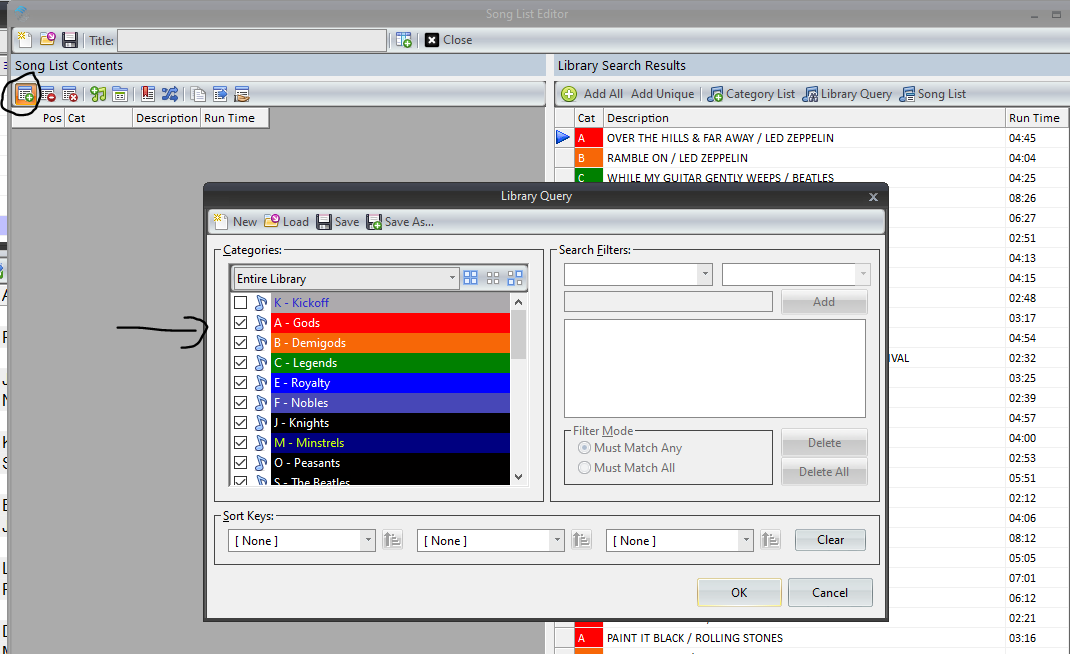
First things first. What songs do you want to include in your A-to-Z list? This is a chance for you to flex your library a little bit. You can go with a true A-to-Z list using only your active categories or if you have a spike/flavor category or two you can add those songs in as well. Go to Dataset, Library, Song List Editor and click on the Find and Add songs icon in the upper left corner. Select the categories you wish to include in creating your A-to-Z list. On the upper right, select Add All to add all your songs to the open area on the left. Keep in mind, you can cull certain songs out of the list after creating it.
Once you’ve got your list, you can sort this list by alphabetical order by clicking on the two arrows crossing over each other. This button allows you to perform various functions on your list, including sorting. I’m sorting by Title, ascending. That will get everything in alphabetical order.
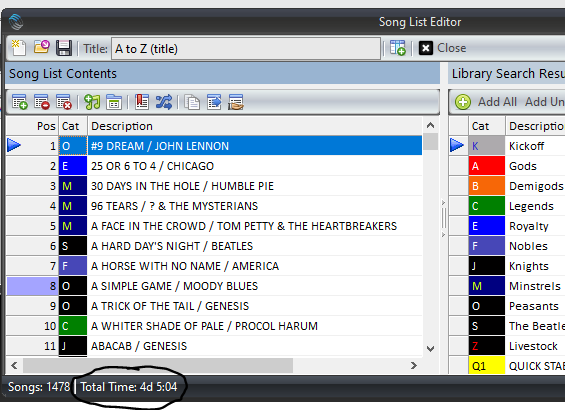
Now you can go through your list and remove any songs you do not wish to include in the A-to-Z weekend. Perhaps you’ve got a regular and live version of a song and you don’t want to play both. You can click on the remove song icon (right next to the add song icon) at the top of the page to remove any unwanted songs. Finally, save this list so you can call on it for your scheduling session. I named my list A-to-Z (title). Pro tip: you may decide to leave some droppable songs in your A-to-Z list as ‘oh wow’ songs, but also as possible drops if you are running a bit long at some point. Just make sure your jocks don’t pre-sell them unless they’re sure to play.
Once you are finished picking out any undesirable songs, note the estimated total time at the bottom of your song list. This is going to give you an idea of how long it’s going to take to get through this list (not including spots, jock talk, imaging, etc.) so make sure you’re allotting enough time to complete the list.
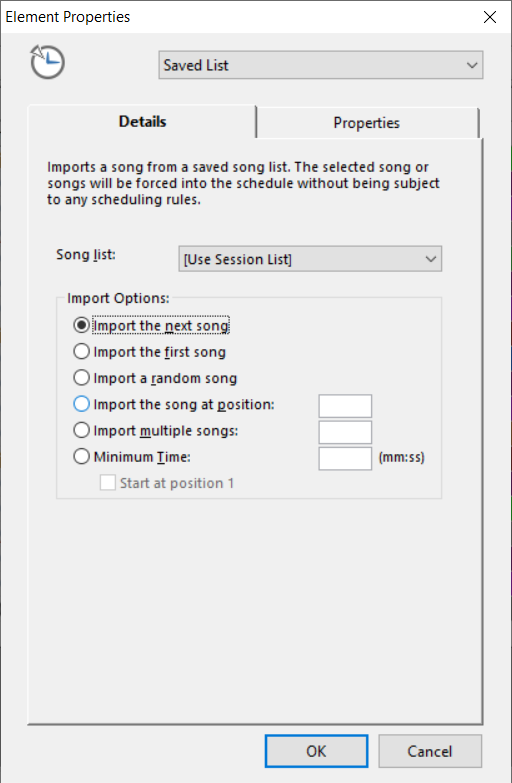
Next, create the A-to-Z clocks. You can clone your existing clocks and replace fixed positions with song list positions or you can create new clocks from scratch. I’ve created some generic clocks from scratch in this case and placed special weekend imaging in as well. Note: You may simply use the ‘Next’ Import option when creating this clock, but if you want to guarantee the list kicks off with the first song any time you run the A-to-Z list, the very first element in the first clock used should utilize the ‘Import the first song’ option when applying the Saved List positions. If you schedule the A-to-Z weekend and you have a false start and need to reschedule, you’ll need to reset the pointer back to the first song if you’re not using the ‘First song’ option in your clocks.
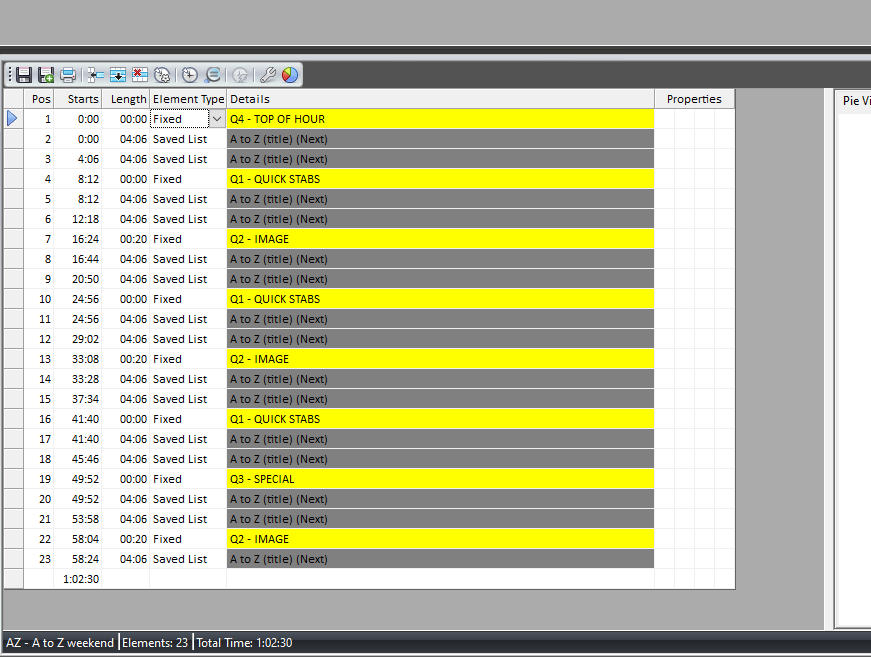
Now that the clock(s) exist, you can create a grid or apply the clocks in the Format Scheduler. If your clocks are more specialized and still have benchmarks, etc. it may be advantageous to create a separate assignment grid for the A-to-Z clocks. If you are just going with special programming/static clocks, you can create generic A-to-Z clocks and simply assign them in the Format Scheduler, like this:
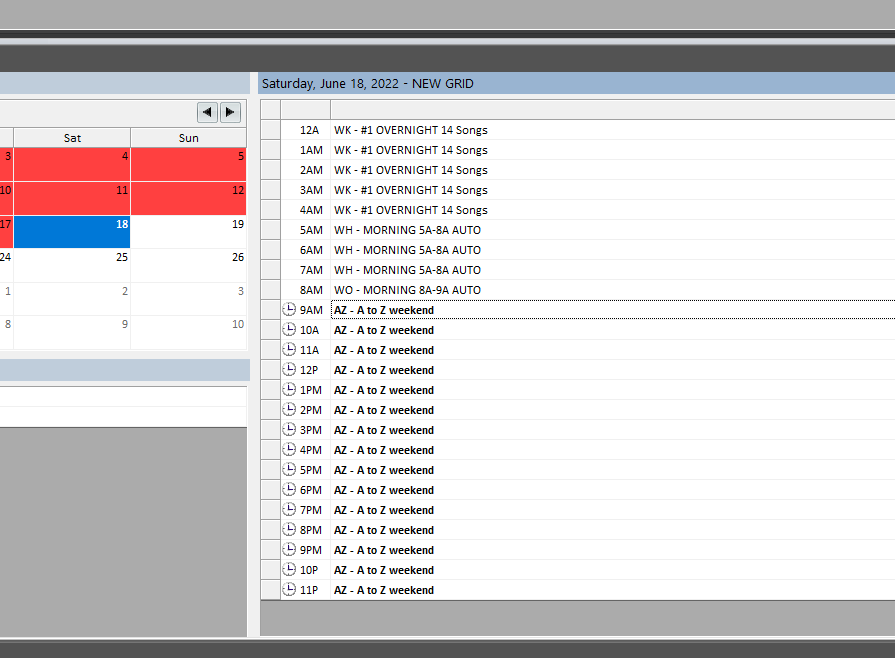
Now you’re ready to schedule your logs. Schedule out the days you wish to include in the A-to-Z weekend.
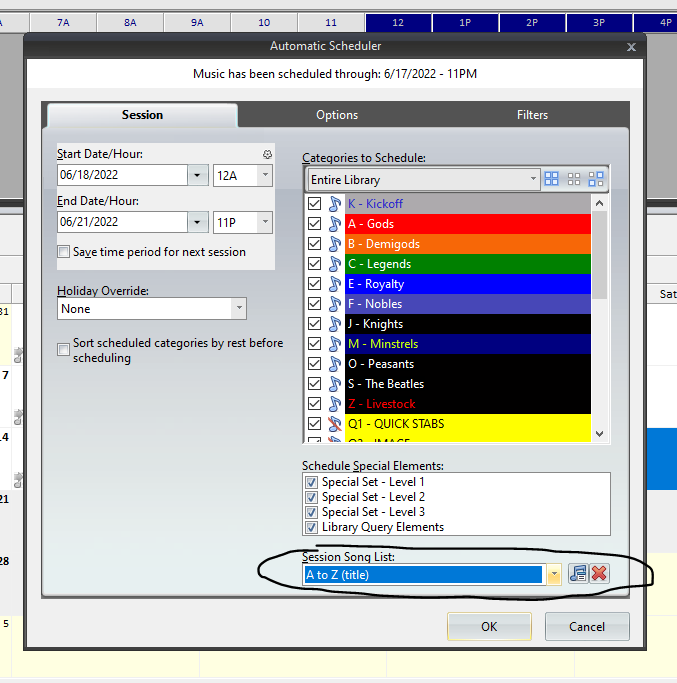
You may have noticed an option at the bottom of the Automatic Scheduler setup screen called Session Song List. This can be used if you set up your clocks a bit differently.
When you built your clock for the A-to-Z Song List, you use the drop down to pick that specific clock. You could have left it at the default, which is Use Session List:
If you use this option, the clocks become generic allowing you to use them for any Song List you have. As long as the clocks are either in the Active Assignment Grid or assigned in the Format Scheduler, you will then get to pick which special you are using when you automatically schedule. In that case, you would then use the option to select your list as you see here:
The beauty of this is, of course, that you have one set of clocks you can use over and over, simply changing the Session Song List setting for whatever special you wish to run.
Once your logs are finished scheduling, edit them to make sure you’ve got your list beginning where you want it to start and that your elements aren’t too sparse or too overscheduled. You can easily move songs from hour to hour by dragging them up and down the schedule while in the schedule editor. I found that my hours could be a little tricky due to really short or really long songs, but adjusting each hour wasn’t too difficult overall. *Pro Tip: If you included droppable records in your list, you can use the marking feature (F7) in MusicMaster to make those songs stand out in your list. When you’re editing, those songs will be easily seen and you can elect to manually drop those if you feel you’re running long. Another tip is perhaps putting an asterisk next to a song title that a jock can drop should they run long in their live presentation and/or if the shows are voice tracked and timing appears to be off.
That’s it! A-to-Z weekends can be very enjoyable listening and a great opportunity for sponsorships. We’ve had many MusicMaster users plan A-to-Z weekends with great success. Give it a try the next long weekend you have!
As always, should you have any questions please reach out to your MusicMaster Scheduling Consultant. We’re happy to help with any questions you have, from A-to-Z!
Which Library Field Type is Right for You? Publicado por Jesus Rodriguez en septiembre 5th, 2022
Which Library Field Type is Right for You?
By Jesus Rodriguez
In PRO 7, we introduced a way for you the user to be able to create more fields for your library by going to Dataset, Library, Fields on your Menu Bar.
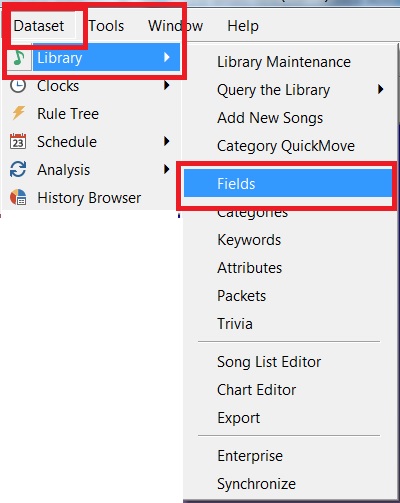
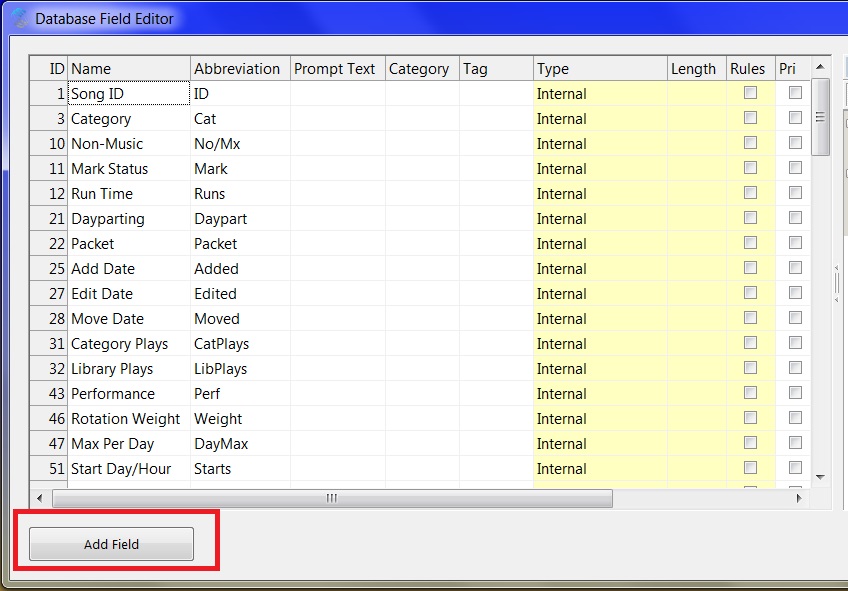
Here is where you can add a field by clicking on the Add Field Button:
You can give your field a name, abbreviation, tag, length, rules or no rules and Field Type under Data Type.
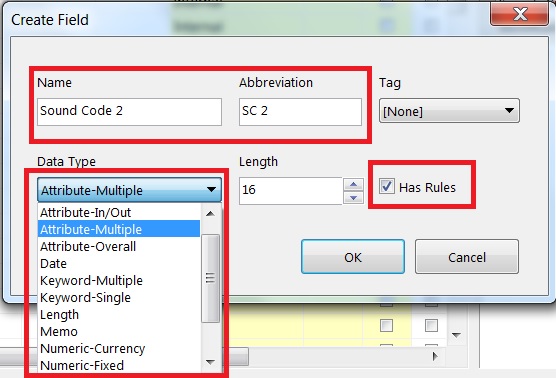
However, the big question I usually get from a client is “Which field type do I select and what do each of these do?” Well, we have a field type for every occasion. The purpose of this blog is to give you a brief example of each of your Field Type options.
- Attribute Combo – Great for coding for items like tempo beginning, middle, and end of a song where the song starts Fast but the middle of the song is slow then picks up to a medium or up-tempo guitar rift of energy at the end.
- Attribute In/Out – While like the previous description this can be used for the opening and ending of a song. For example, if a song opens up-tempo but ends slow or sad with an A cappella.
- Attribute Multiple – This version is great for sound coding because you can select multiple attributes for any one song. For example, a song may be pop but it’s also rock, and rap because of a featured artist. This allows you to have one song to have a very detailed list of codes so that MusicMaster knows it’s a R- Rock, P-Pop because it crossed over to the pop world and am R-Rap because there may be a hip hop artist doing a verse as a featured on the track. This field type will then allow you to control this track with your rules from playing too close to other rock, pop, or rap songs.
- Attribute Overall – Unlike my previous examples this field gets straight to the point and only allows you to assign one code to the song when using this field. For example, this song is Slow, that’s if there is no concern by you about how it is in the middle or end only one overall description for its tempo.
- Date – Exactly what you think. This field for placing a date on the song. This might be a release date or something similar about the song.
- Keyword Multiple – This version of this field allows you to place more than one artist name into the artist keyword field but can also be used for other things like when using special sets and you need a keyword field. There are more blogs on special sets on our site.
- Keyword Single – If you only plan to use one artist name as your separation then this one is for you but if you deal with many artists in your format featured on other songs at the very least may I suggest the previous keyword multiple field type.
- Length – Great any duration needs. Keep in mind we have a built-in Runtime field.
- Memo – A good one for any type of internal notes for yourself about the song or item. Pronunciations, birthdays, internal reminders, song lyrics, etc.
- Numeric Currency – If you need to assign a dollar amount to your item this field is for that purpose possibly for items like promos. You can then include this dollar amount with your affidavit for this item. Feel free to search our site for how to create affidavits.
- Numeric Fixed – Year is a good example for this field or any set of whole numbers.
- Numeric Float – This field is great for items like music test scores that may not be a whole number like 88.7 or this song received a call out of 7.8
- Text – One of our most used fields for meta data entry like cart numbers, artist name, title, album, record label, ISRC codes, etc.
- Yes/No – This is highly used for items that can only be one of two things. For Example, Core or Non-Core, English or Spanish, Pass or Failed music test.
You might have noticed the fields in my screen capture above that had a Type of Internal. These are fields specifically created to manage the MusicMaster database. As such, you cannot create any new Internal fields.
For the fields you can create, there are certainly more possibilities for what you can do with these fields other than the examples I’ve shared. Be creative and think about what you’d like to control and then pick the best field for that purpose. If you can dream it I am sure one of these field types can do it.
Please feel free to contact your MusicMaster support representative with the result you have in mind so we may suggest the proper field to use should an example in this blog not completely answer your needs.
Configuring the Format Clock Display Publicado por Laurie Knapp en agosto 22nd, 2022
Configuring the Format Clock Display
By Laurie Knapp
Just like in other areas of the program, you can configure how the clock editor screen looks in MusicMaster. This article will show you some available customizations and explain what each display column means.
First, the Show/Hide Pie View icon gives you the retro pie chart view, along with panels with information on category and element usage. Also in this panel is the Migrating Positions and FlexRules Analysis wizard, new in Version 8. (Read more about that feature here: https://musicmaster.com/?p=8220)
As you can see, you can split the screen to display both views.

To change the colors of the pie chart to be more meaningful to you, go to Tools > Options > Display Colors. As an example, I will change my Stopsets to be a bright red color.
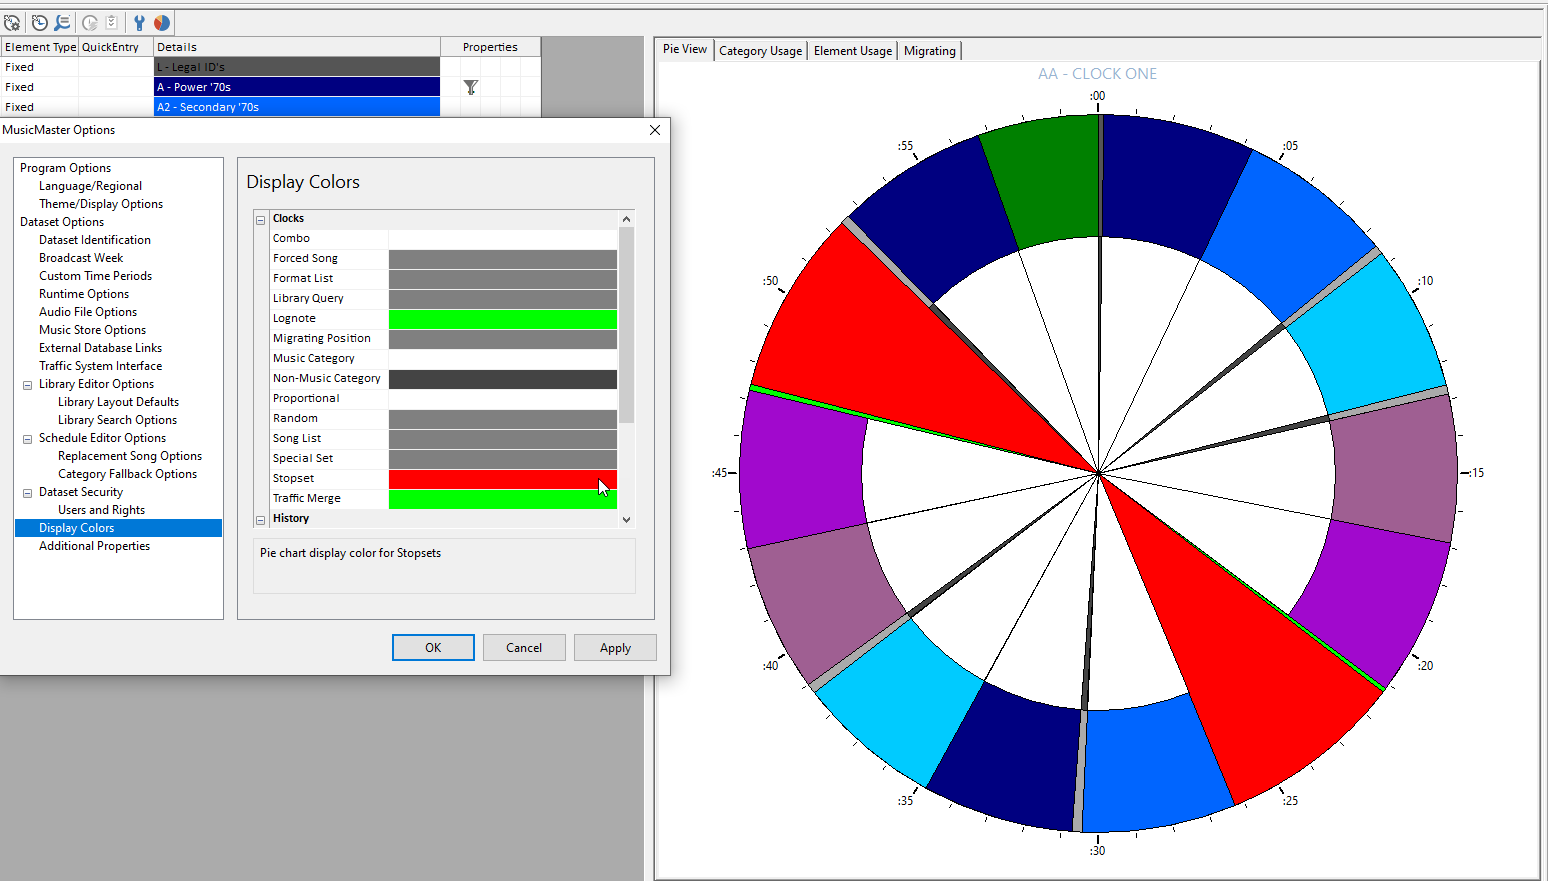
If you’d like to add category and element information to the pie slices, go to the Clock section of Additional Properties and add the number 1 in the Pie-Clocks-Labels field.
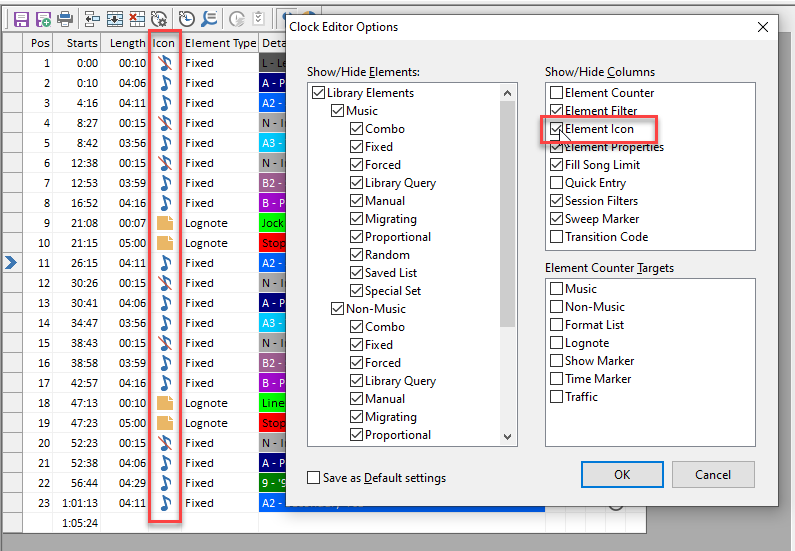
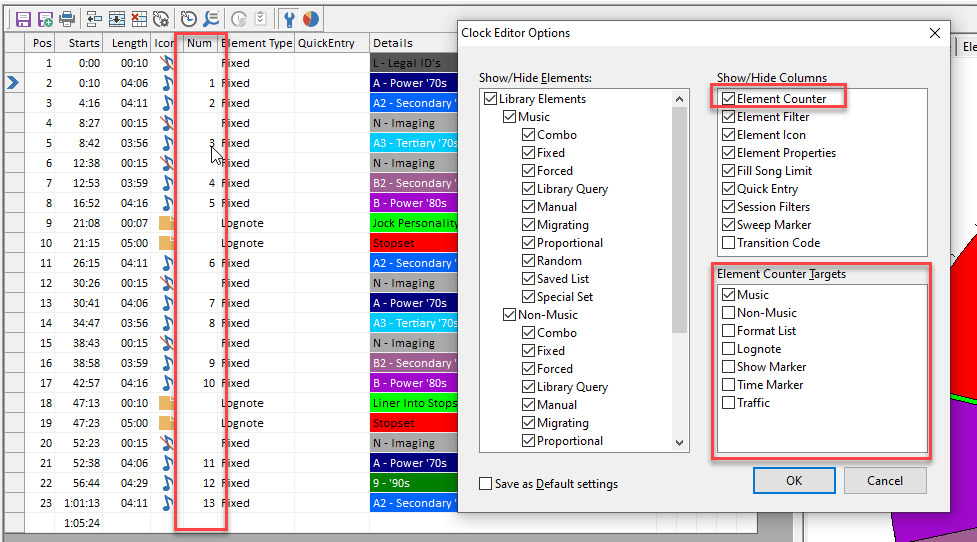
Back in the Clock Editor, you can click the wrench icon to set Clock Editor Options.
You can filter what types of elements are displayed in your clock while you are editing. For example, you may choose to hide Lognotes when editing your music elements.
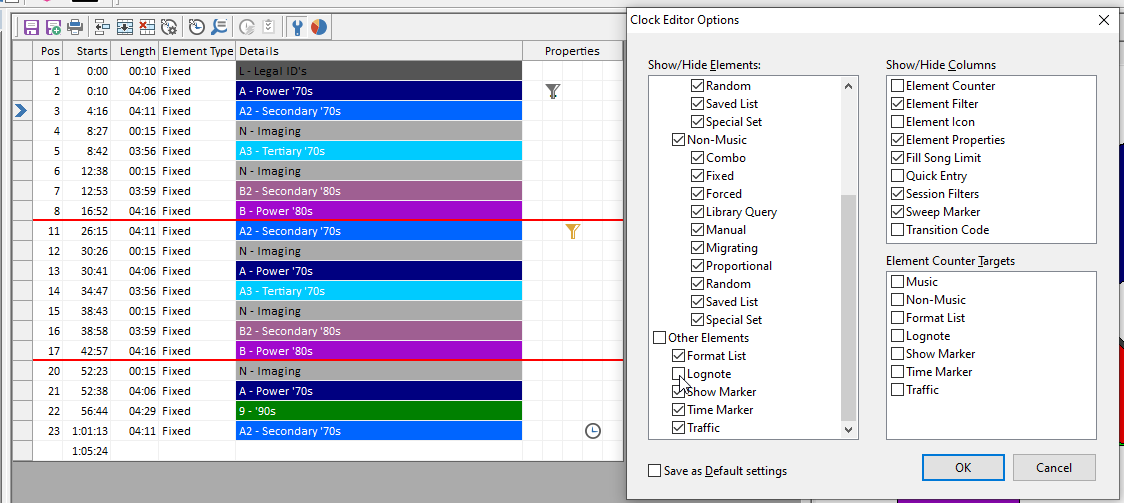
You can also determine which columns you see in your clock editor.
Some of these columns, shown under the Properties header, contain icon markers that represent element properties. You can double click the icons to edit the related properties. You can also hover over the icons to get a balloon tip.

For example, when you add a stopset that is a sweep marker, you’ll see a red stop sign with an S inside.
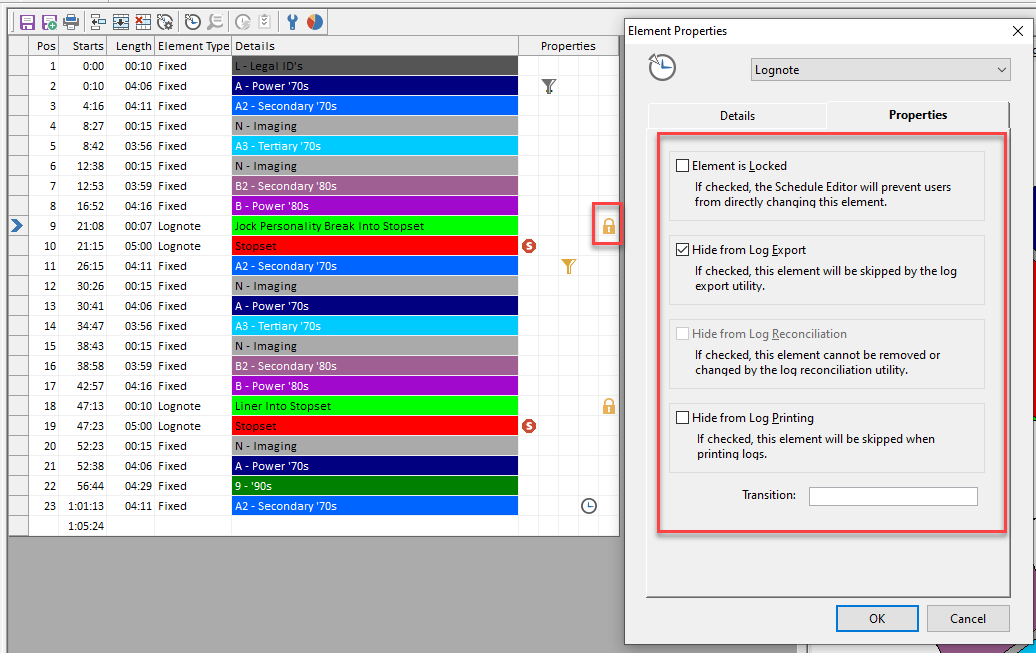
If you chose to lock the element, or hide it from export, reconciliation or printing, you’ll see a lock icon.
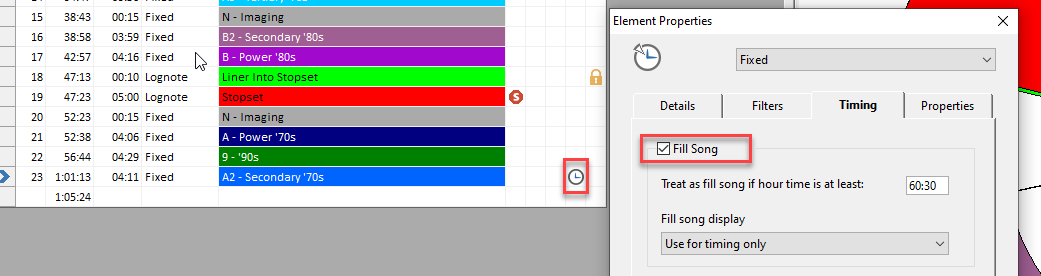
If you set a fill song for timing, you’ll see a clock icon.
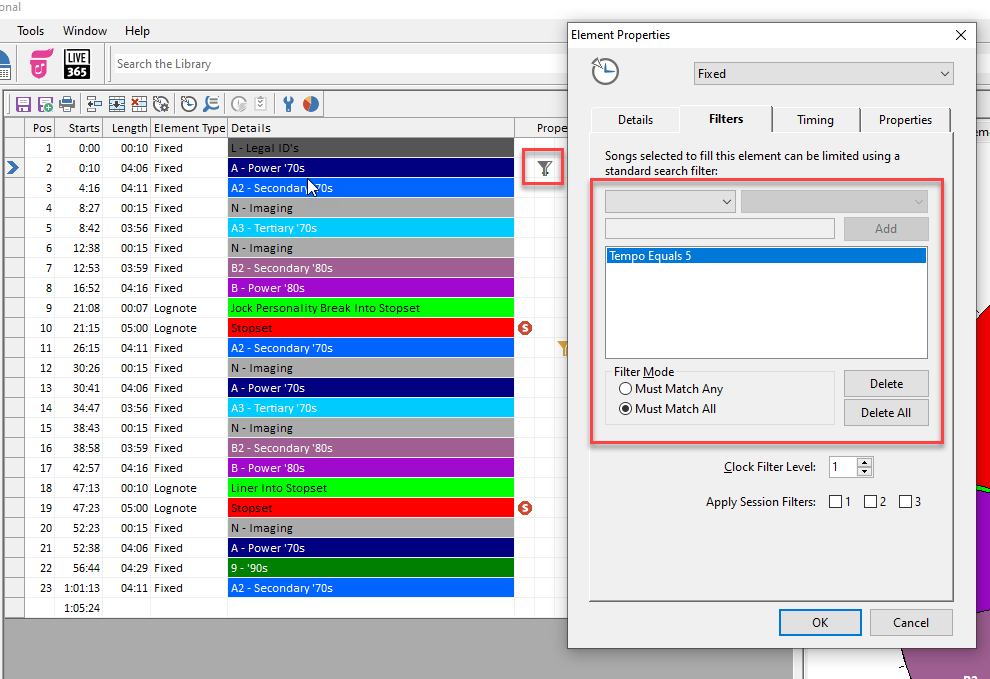
You’ll see a filter icon when an element has an element filter or a session filter. An element filter calls for a song that meets criteria you set in the element properties. (Watch a walk through on setting up Clock Filters here: https://www.youtube.com/watch?v=D76hqFv8nzc)
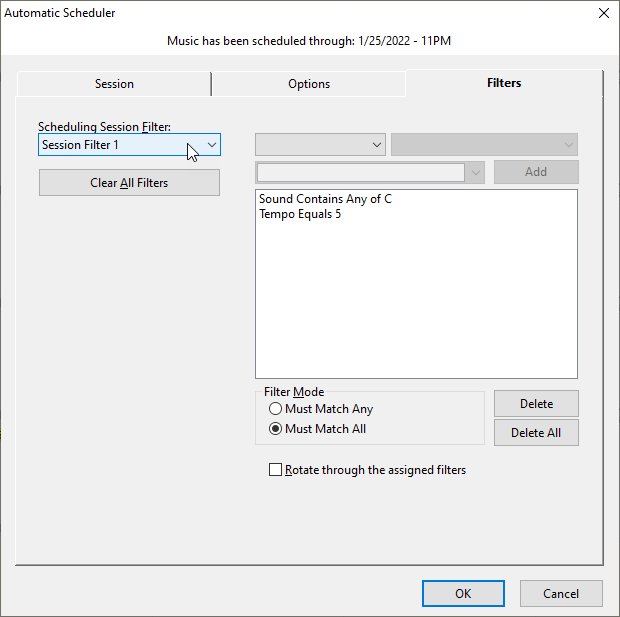
A session filter calls for a song that meets criteria you set later in the AutoScheduler, so you can use different criteria each time you schedule. (Read more about Session Filters here: https://musicmaster.com/?p=6702)

Other columns include the Element Type, or an Element Icon which represents the type.
The Quick Entry column gives you a place to quickly add and configure new clock elements using simple letter codes. You can look up the codes in Help, or by hovering over the element type in the InfoBar. (Learn more about Quick Entry here: https://musicmaster.com/?p=7440)

You can also check on the Element Counter, which allows you to see a secondary count of all elements that match the type you select in the box below. For example, you could use this to see at a glance how many music elements you have in your clock.
If you don’t see all of these options, make sure you’re on the latest version of MusicMaster. You can go to Help, Check for Update.
Should you have any questions or need assistance, reach out to your Music Scheduling Consultant.