
MusicMaster Blog
Linking Song Cards to Audio Files in MusicMaster geposted von Webmaster am April 28th, 2014
By Drew Bennett
Lately, we’ve received a lot of support calls about setting up audio in a database so you can listen to segues or whole song files. After all, music is why we all do what we do and being able to listen to it while you schedule is a great feature to have in MusicMaster.
The first task in linking audio is to note the field number of the field that holds your automation number. Typically, automation systems give a number to the audio filename and you store that in a MusicMaster field. Head to Dataset, Library, Fields. Find that field in the list and note the number to the left of the field name. We will need this later when we’re setting up our audio link.
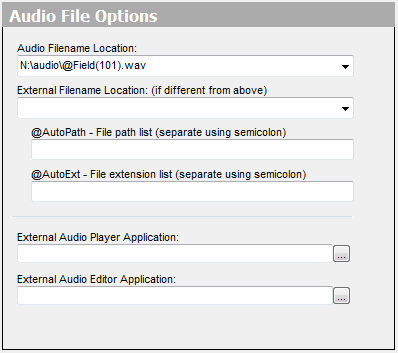
The next step is to link audio to our song cards. First, head to Tools, Options, Audio File Options. The first field here is where you’re basically referencing the path to your audio files. It’s the most important field in this screen. Let’s say all your audio files are just the automation number with a .wav extension. Let’s also say they all exist on the N:/ drive in a folder called, ‘audio.’
The first thing you need to do is type in the path so it reads N:\audio. Now you need to tell MusicMaster what the filename will be. To add the automation number to the path, you need to use some scripting. @Field(XXX), where XXX is the number of the field you noted at the beginning. So now you have N:\audio\@Field(XXX). Tack on the file extension as .wav or .mp3 and you’ve finished the path: N:\audio\@Field(XXX).wav.
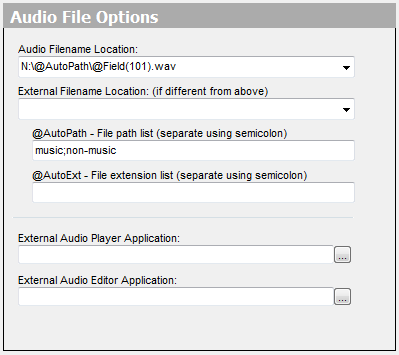
 In some cases, your audio may exist in multiple sub-folders. In this case, you’ll use the @AutoPath field inside Tools, Options, Audio File Options to account for multiple sub-folders. Let’s say you have two folders: one is called music; one is called non-music. Each folder is in the N:\ drive. Using @AutoPath, you will build your path in the Audio Filename Location field. Here’s an example: N:\@AutoPath\@Field(XXX).wav. In the @AutoPath field inside Tools, Options, Audio File Options type the folder names separated by semi-colons. Here’s an example: non-music; music.
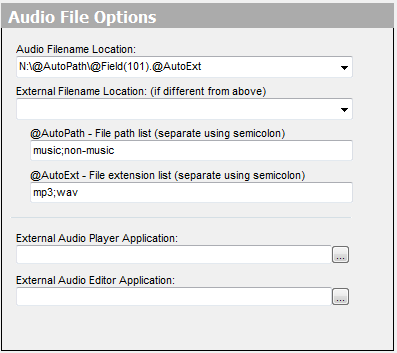
 Similarly, you may have multiple files extensions. For instance, you may have both .wav and .mp3 files in your library. To make sure all types play when you need them to play, use @AutoExt to define multiple file extensions. In your example above, N:\@AutoPath\@Field(XXX).wav, we will remove the wav and add the @AutoExt macro. Now we have N:\@AutoPath\@Field(XXX).@AutoExt. In the @AutoExt field inside Tools, Options, Audio File Options type file extensions separated by semi-colons. Here’s an example: mp3; wav.
 Once your path is built and you’ve applied your settings, you can verify your audio by heading to Library, Audio, Verify. This will tell you whether or not MusicMaster connected to the audio files or not. Your setup will use your specific drive and directories where the audio lives. If your audio has been successfully verified, let’s open up some windows, let in some fresh air and play some music! Hit F12 on a song card in the library to hear the song. Choose View, Audio Player to control audio playback. In the Schedule Editor, you can right click a song, choose Audio in the menu and see a variety of listening options including song segue ways.
If you have further questions please contact your assigned Music Scheduling Consultant and Happy Scheduling!