
MusicMaster Blog
CRTC Reports and How to Run Them posted on November 28th, 2016
By Drew Bennett

O Canada! Where pines and maples grow; Great Prairies spread and lordly rivers flow…and where 35%** of a broadcast hour’s musical content must be Canadian! Today, we’re going to look at CRTC (Self-Assessment) reports and how to get accurate information from MusicMaster when you need to keep track of CANCON.
Keeping track of CANCON is easy in MusicMaster but before we generate any reports, let’s take a look at a section of the software that’s important when it comes to running some special reports: Custom Time Periods. Heads to Tools, Options, Custom Time Periods. Here is what you see:

In this screen, you need to define any custom time periods that need to be included in your report. In Canada, those custom time periods are typically 6am-6pm and 6am – 12Mid. Use the fields under First Hour and Last Hour to build custom time periods. When you’re finished your screen should look like this:
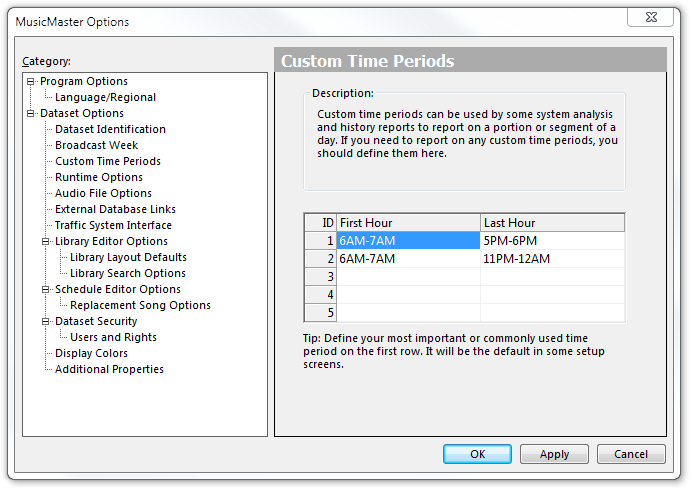
Choose, “Apply, “and, “OK, “to finish defining your custom time periods.
Now, it’s time to setup and generate a CRTC (Self-Assessment) report. It’s all done in Dataset, Analysis, Special History Reports. Here’s what you see:
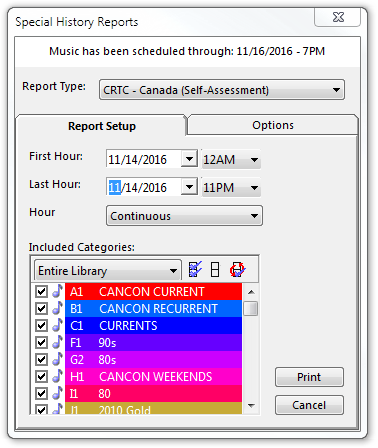
Use the dropdown menu to select the CRTC (Self-Assessment) report. We have an important step before generating the first report. That step is to head to the Options tab and set up the report.
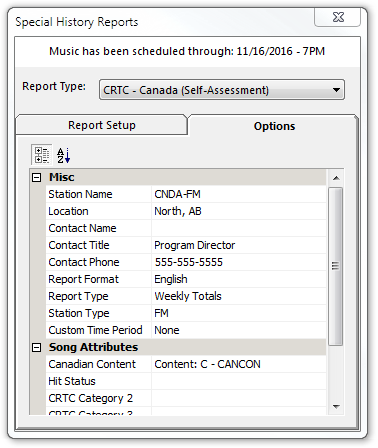 The section labeled, “Misc, “contains fields that need to be filled out so that all of the station information is included in the report. The, “Station Attributes, “section contains fields that need to be mapped to fields in your MusicMaster database. If this is not done, the report will be empty. To configure this report to show CANCON, the only field that should be mapped is the, “Canadian Content, “field. That field should be mapped to the attribute and code that denotes Canadian Content in your database. Typically, that information is stored in the Content field and the code in that field is, “C, “for CANCON. Your database may be set up differently. Once the report tab has been filled out and mapped, you should never need to come back and make changes. This setup is saved and you are free to run a CRTC (Self-Assessment) report.
Head back to the Reports tab. The key here is to uncheck any category that should not be included in the report. Often, that is any non-music category like an Imaging category or perhaps a Promo category. It is important to include Rest or Hold categories in the report. Songs that played in other categories during the report time, but now reside in a Rest or Hold category, will not be reported on unless the category where the song currently resides is checked.
Make sure dates are correct for this report and leave the Hour set to, “Continuous.” Choose, “Print, “to generate the report. A screen appears and you can review the results of the report for each Custom Time Period defined in the database.
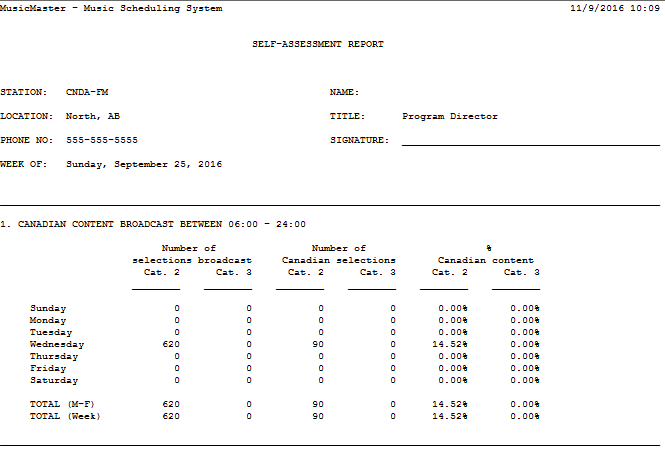
That’s it! You should be able to review accurate CANCON information for the time and dates you specified. If you have trouble generating this report or you have further questions about running agency reports in MusicMaster, please call your dedicated Music Scheduling Consultant and happy scheduling!!
** 35% is the average requirement of CANCON and does not include Category 3 rules, border station rules or other special rules that could affect hourly and daily CANCON percentage requirements.