
MusicMaster Blog
The Session Filter – Specialty Programming With One Click posted on March 14th, 2016
By Marianne Burkett
Many radio stations around the country celebrate the weekends by spicing up the music starting Friday afternoon. Whether it’s an A-to-Z weekend, a countdown show or maybe just a focus on some “type” of music. There are different ways to program those specials in MusicMaster. Today I’m going to focus on programming a specific “type” or “style” of music using Session Filters. For example: How to schedule a #1 hit weekend. Once in place in the clocks, Session Filters are like a secret weapon for one click specialty programming. Here’s how:
As a programmer the first thing you have to do is identify and code those songs.
- Create a new Sound Code by going to Dataset/Library/Attributes/Sound and create your new code.
- Apply those codes to all relevant songs. Be sure you have enough songs in each category that qualify for your special. If there are not enough songs, you may want to re-think your special.
- Go to your clocks and apply Session Filters to any positions where you’d like your #1 songs to play. Here’s how: Double Click on the category in the clock to open the properties of that position. You’ll see four tabs: Details, Filters, Timing and Properties. Go to FILTERS. Look at the bottom of that Filters display and you’ll see Apply Session Filters. Put a check mark on 1 like this:
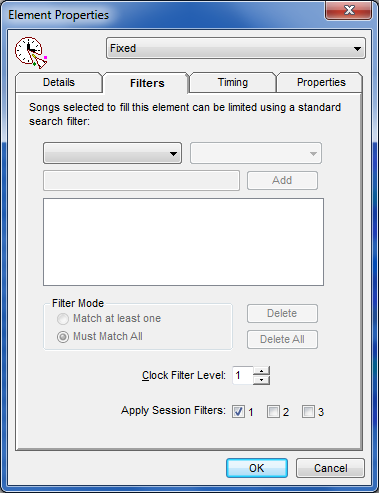
Click OK.
Repeat this step on any position in the clock. Save the clock(s). Once the Session Filter is in place on the position, it is invisible to the eye but packs a powerful punch in the Automatic Scheduler.
Hint: Consider different clock positions for different Filters and consider letting two or more Filters apply to a position. This will give you more flexibility when you run the Automatic Scheduler. More on that in Step 5.
- Now that you’ve added Session Filters to all the clocks for the special and saved, go to your Rule Tree. At the bottom of the Available Rule Types on the right are your Format Clock Rules.
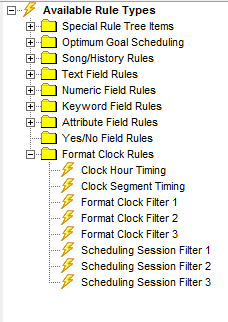
Grab the Scheduling Session Filter rule and drag it into the All Categories Unbreakable Folder or drag it into the Unbreakable Folder of any specific category you’ve placed the filters on in the clocks. Save your Rule Tree.
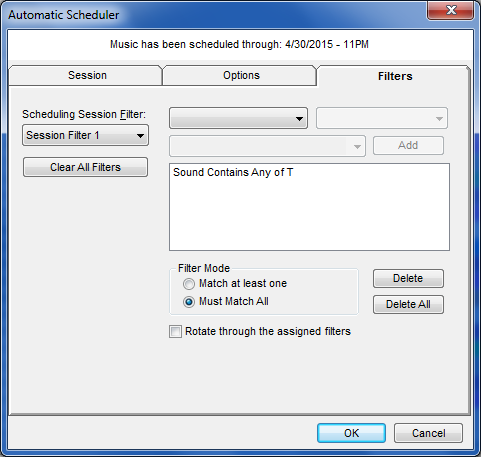
- Now, you’re ready to Schedule! Go to the Automatic Scheduler. Pick the dates for your special and then, pick your Filters Tab and set your Filter. Click OK and the Auto Scheduler will start! Be sure once you’re done scheduling to CLEAR ALL FILTERS. Don’t worry if you forget, though, as there will be message on the Session tab that will tell you a Filter is in effect until you clear it.
Remember that hint to use more than one of the Session Filter check boxes? Here’s where that can really give you an edge. If you have multiple specials, you can change which Filter you use each week. That way, perhaps the special songs will play in different positions each time you use the clock. If you do that, just remember to turn on the additional Schedule Session Filter rules.
This is a simple way to change the flavor of any weekend or weekday special (lunchtime, drive home etc..) in a minimum amount of time without having to create additional clocks for each special.
Happy Scheduling. If you have any questions about Specialty programming your station, don’t hesitate to call me or your Music Scheduling Consultant here at MusicMaster.