
MusicMaster Blog
3 Things All Stations Should Do posted on November 30th, 2015
By Jerry Butler
You wouldn’t drive your car without regular oil changes and maintenance. Are you taking that same care for your database? If you lost your data, how long would it take for you to rebuild your database… hours, days, weeks, months? All databases are different, but one thing is true about them all. Regular maintenance insures the health and wellbeing of your data. With these three steps, you can help keep your database running smoothly and be prepared for a catastrophic disaster.
Step 1: Running Schedule Purge
MusicMaster tracks and stores two types of history. Archive history is the history of everything you have scheduled with MusicMaster. Archive history is available for reports, but is not tested when scheduling. Active history is the history that your automatic scheduler looks at each time you schedule to insure your logs are produced according to the rules and goals you have set. Though not a step you need to do regularly, you want to check your active history settings and make sure you are retaining your data long enough so that your scheduler will recognize the past few plays. You can access the active history settings by clicking on Dataset, Schedule and Purge History.
The default settings for your active history is a minimum of 90 days or 8 plays. This can be adjusted if needed, but the key here is to make sure your “Automatically purge history when necessary” check box is selected.
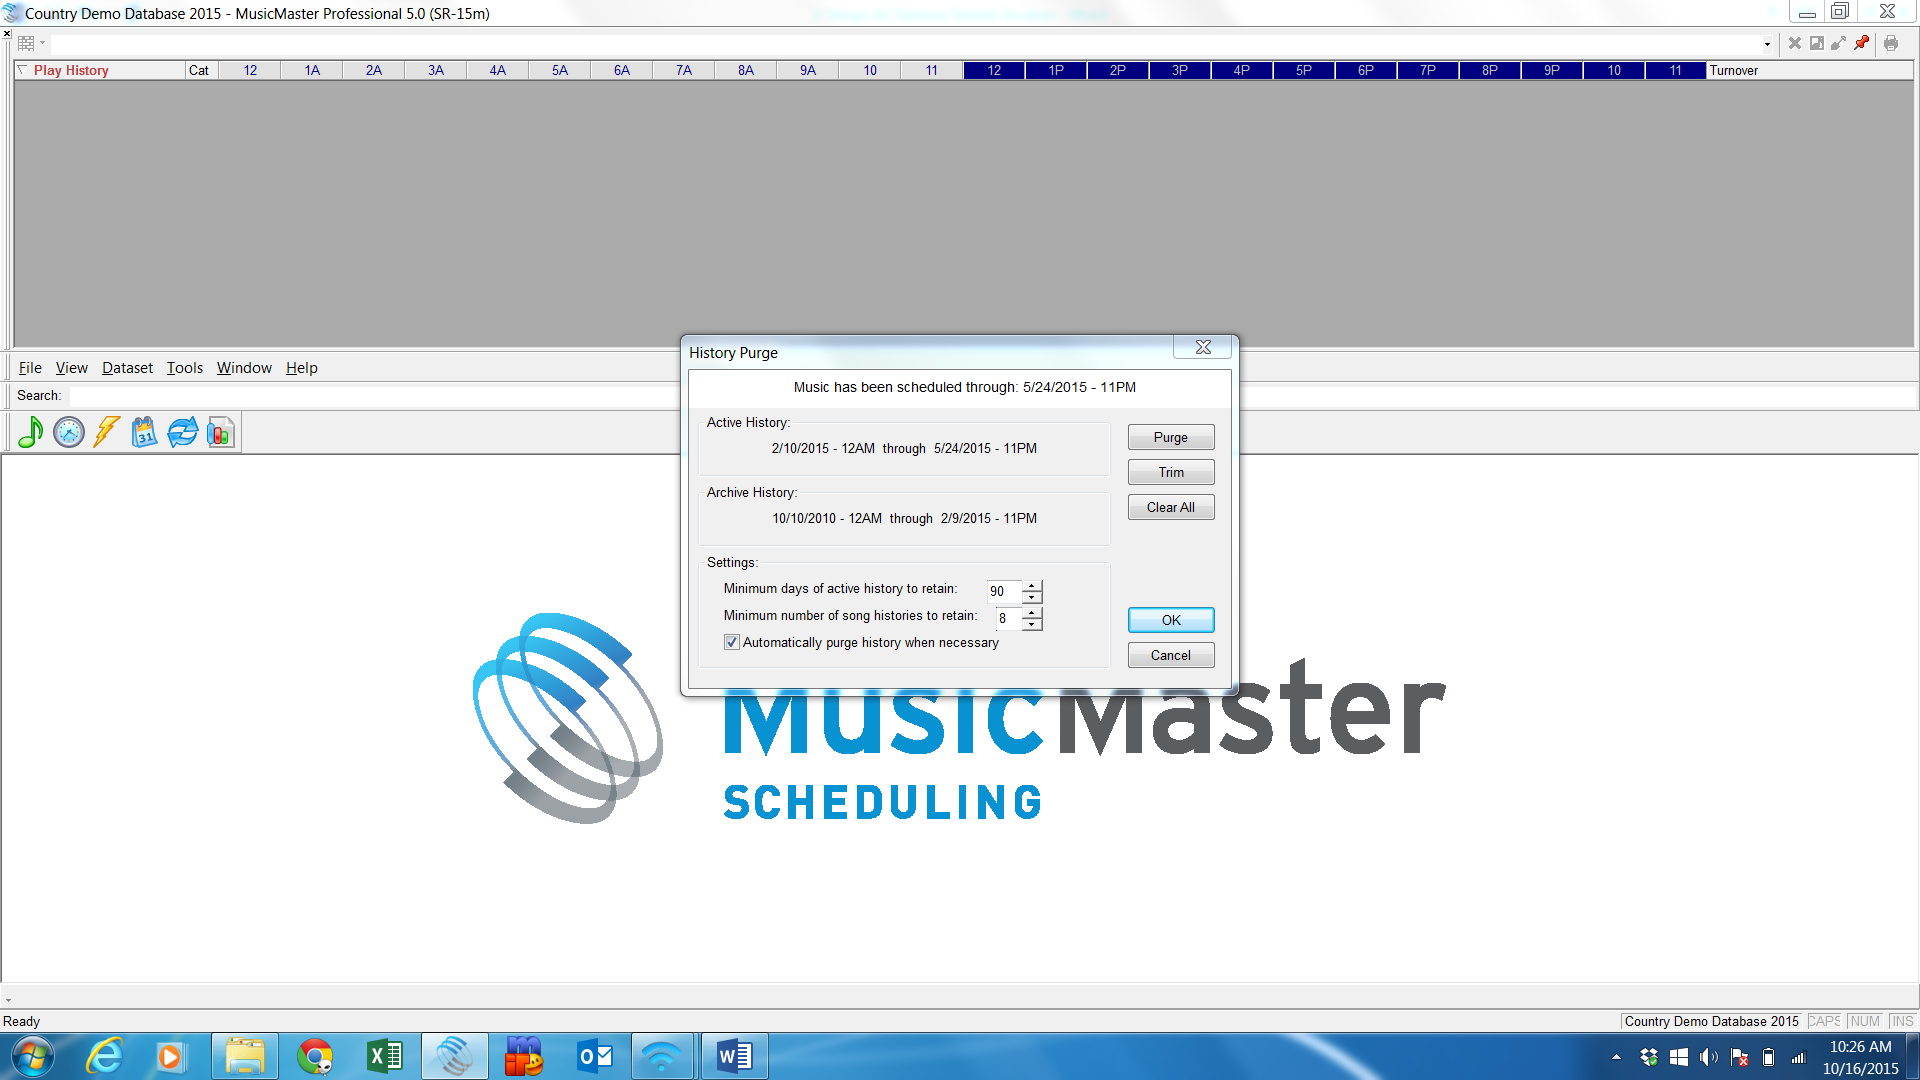
If this is not selected, your active history will continue grow and potentially slow down your scheduling and editing process since there will be more history to review. If this was not set up, I recommend clicking Purge after you have set the database to automatically purge history when necessary. You only need to do this once after the set up.
Step 2: Running Tools Purge
I find that users are often afraid of checking out this feature because “Purge” just sounds scary when you are discussing your database. Why would I want to “Purge”, or “Get rid of”, or “Delete my Database?” Tools Purge does not do that. Purging compacts your data. It’s much like the defragmenter on your hard drive. The result is a more efficient database. Make sure no one else is in the data when you go to run Purge. To purge the data in MusicMaster, choose Tools, Purge. You will notice the database purge running by viewing the bottom left hand corner of your MusicMaster window if you are showing your status bar. You may see a decrease in your database size from .2% to 97%. I recommend you run tools purge at least every couple of weeks. I generally run Tools Purge after I schedule new logs. I do this for two reasons. It not only cleans up the tables in your database and makes it efficient and faster, but this utility also creates a .bak file that is another form of backup. This however does not replace Step 3: Running a backup.
Step 3: Running a Backup
I’ll walk you through how to run two types of backups and both are important. Running a backup only takes a few seconds, but could save you hours, days, weeks or who knows… maybe years depending on the size of your database. Arguably, the most valuable item in your programming arsenal is your data. I see databases from 175 songs to over 250,000 songs. How would you react if your database were gone when you got to the station tomorrow morning? Here is how you create a standard backup and set up a custom backup.
Standard backup backs up your database in a .zip file and stores it in the same location as your data is stored. Make sure you are the only user in the database and that any items that you have been working on such as clocks are saved. Click Tools, Backup and Perform Standard Backup. You’ll notice the database being backed up on the left hand bottom corner if you are showing the status bar.
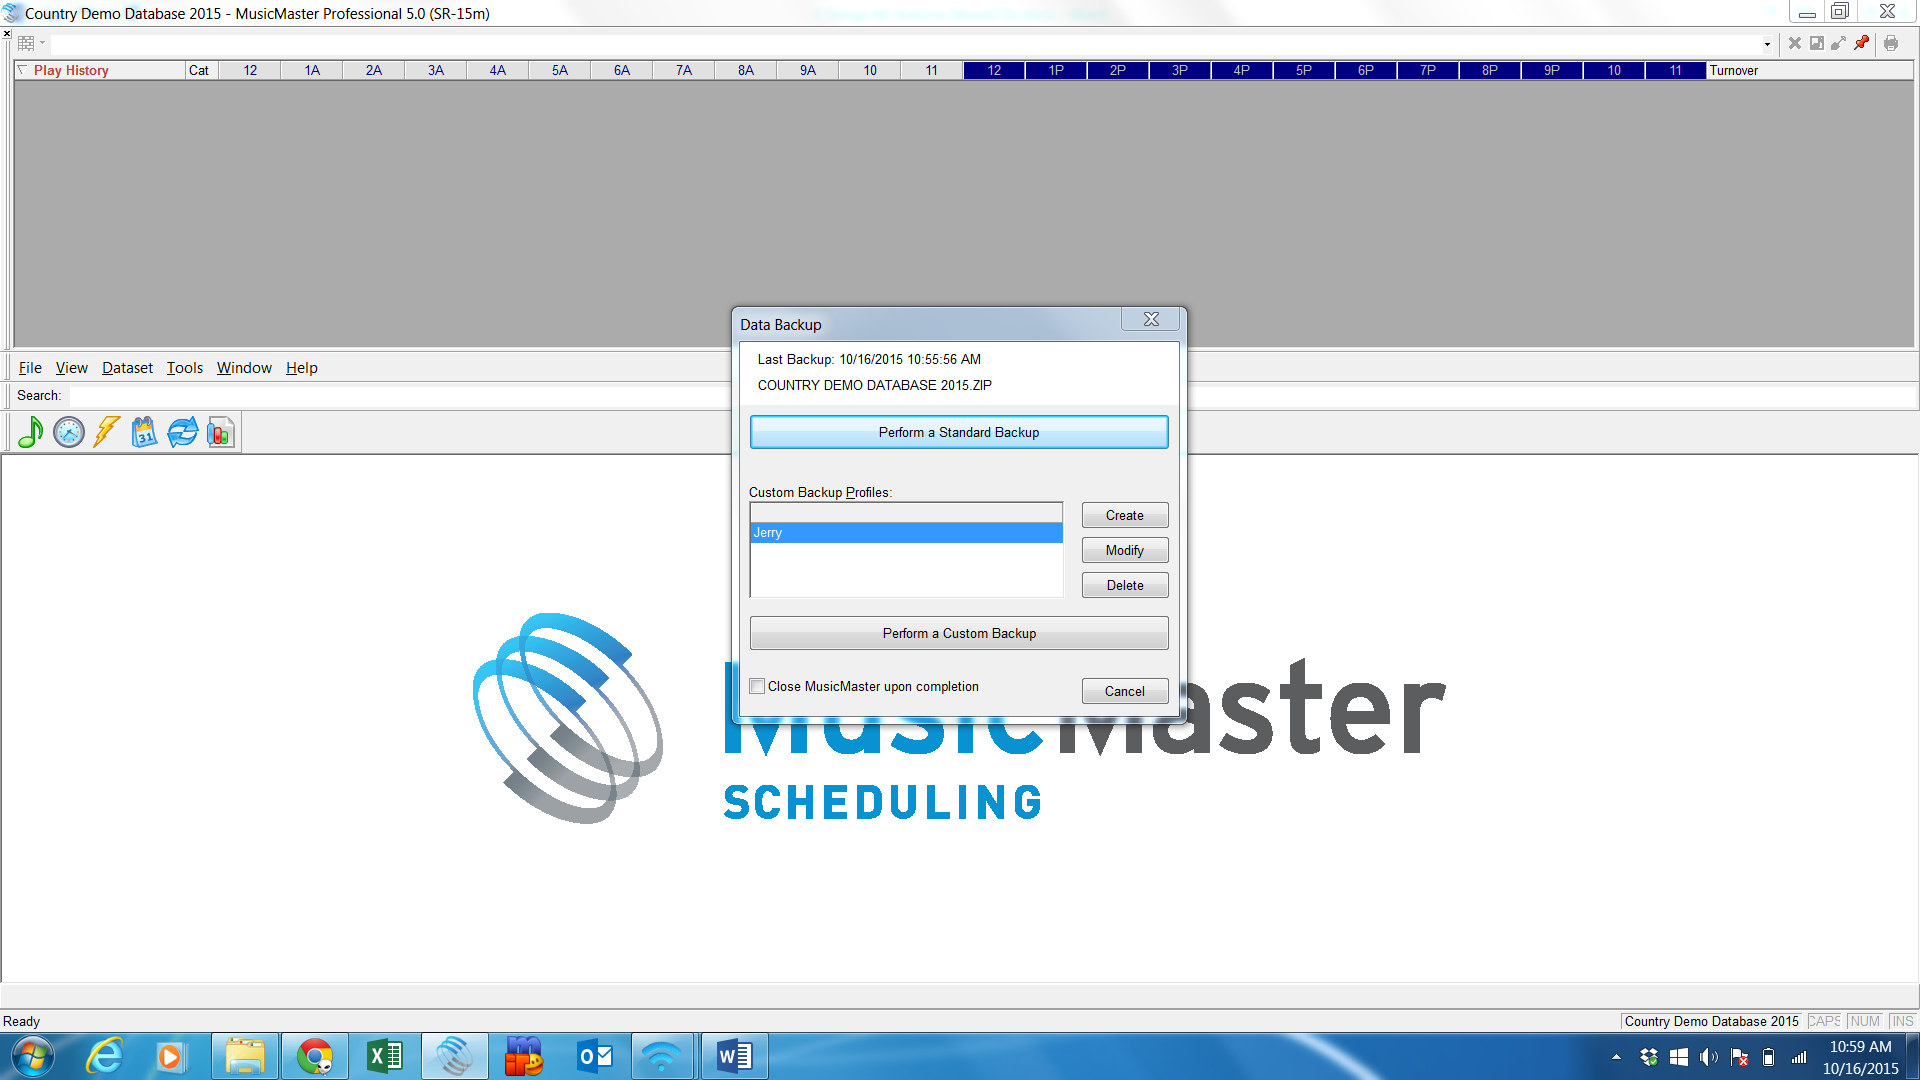
You can also create a Custom Backup. This can be created to backup to another local drive, network drive, USB Drive or other service like Drop Box. There are other services for cloud storage, so pick the one that works for you. For this illustration, we’ll walk through setting a custom backup for Drop Box so that your data is backed up offsite. This is particularly important if something were to happen to your drive, your computer, your server, your USB drive or the station. Drop Box can be set up on multiple computers at multiple locations making it easy to retrieve your backup. If you don’t have a Drop Box account, you can sign up for free at www.dropbox.com.
Once your Drop Box account is set up and installed on your local computer, you access the same way you would any other drive. To set up the Custom Backup, Click Tools, Backup and “Create” under Custom Backup Profiles.
I recommend you save your definition files. These are files found in your database folder with a .def extension. These are generally your reconciliation files or sync files. Click on the “Save Definition Files” field and select yes to include your definition files in your backup. In the “Backup Filename” field click the drop down icon on the right and find the path to your new Drop Box. You’ll click on the Drop Box folder, then select the folder you would like to store your backup. I’ve created a folder called “Backup” here. Once you select the folder, click OK and you’ll notice the path in the Custom Backup Profile popup window now reflects the path to your folder in Drop Box. Make sure and name your Custom Backup at the top of the popup window. I named my backup “Drop Box”.
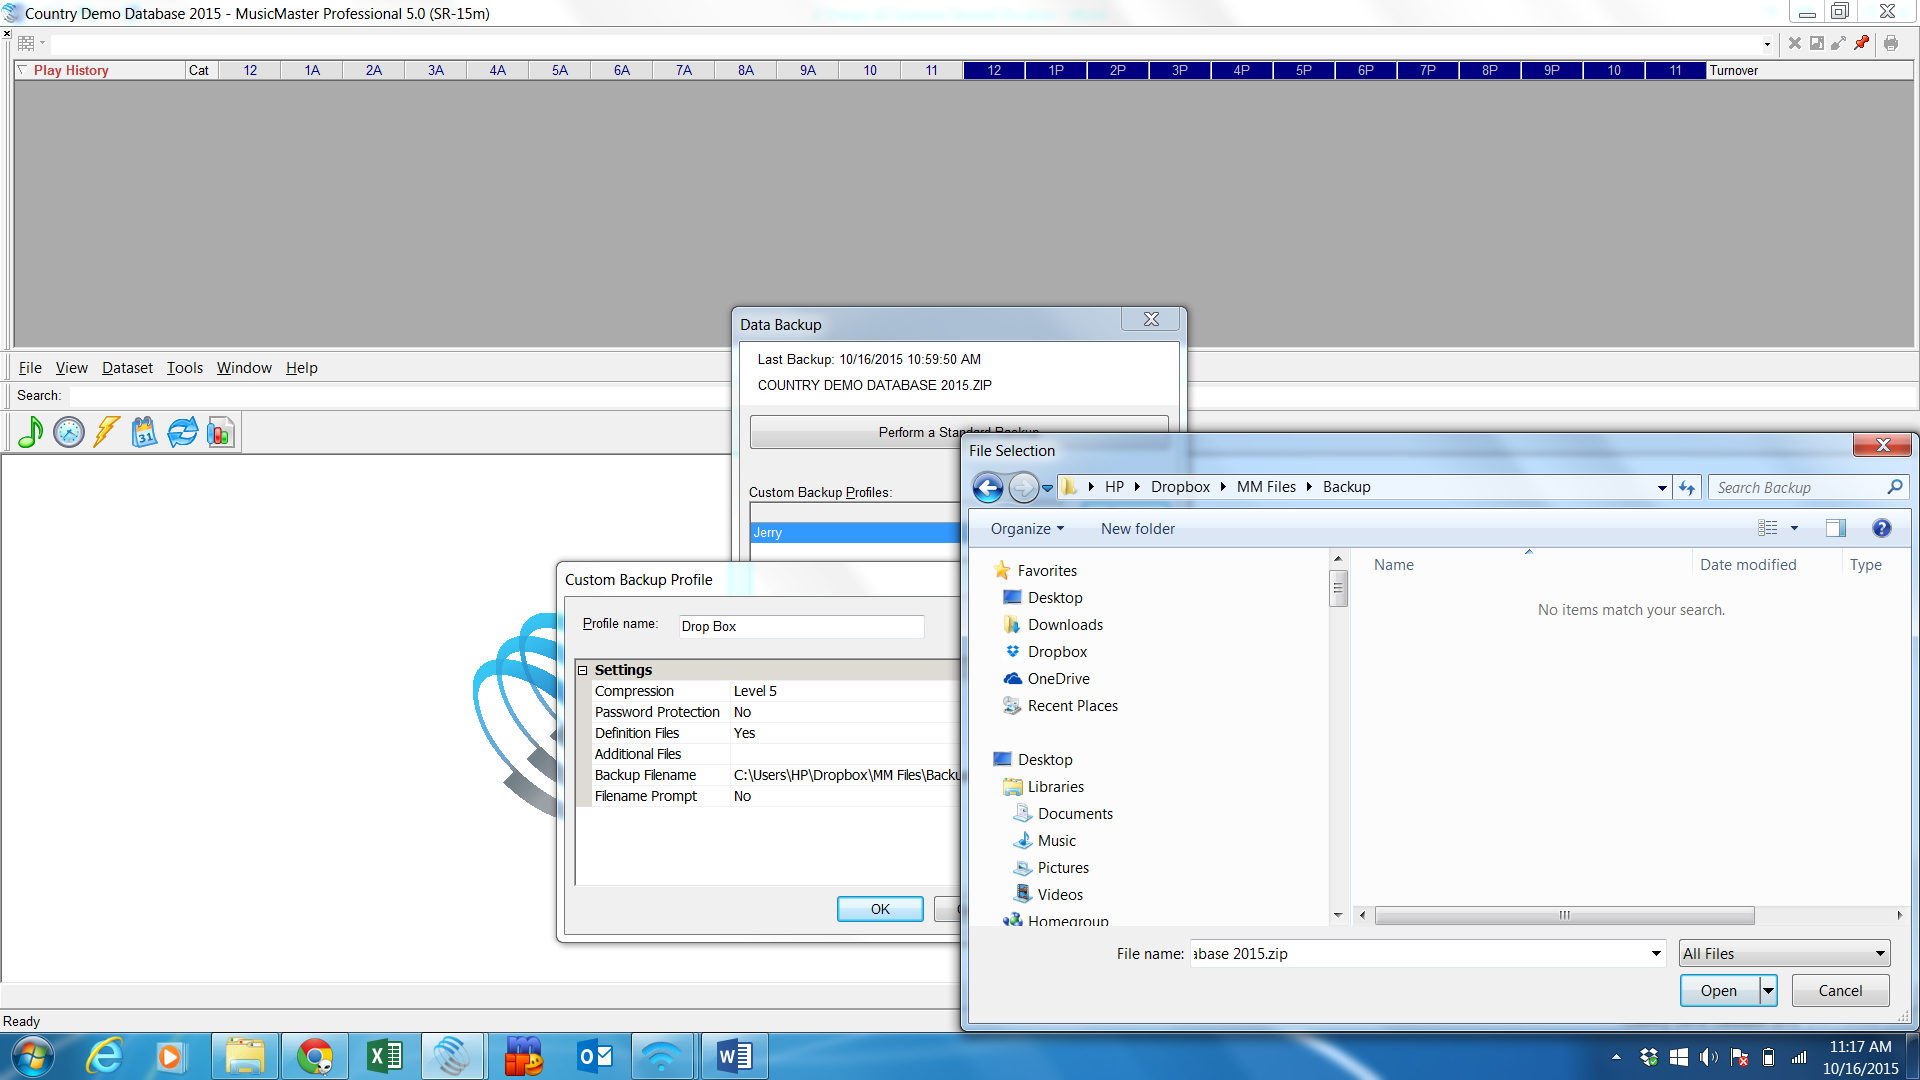
Once set up, click OK. You’ll notice your new custom backup listed in the Custom Backup Profiles Window. To run your custom backup, select the backup and click run custom backup. If you are running a Drop Box custom backup, you’ll notice your Drop Box icon showing the circle reflecting the activity of saving your database.
Rest easy knowing your MusicMaster database is clean and backed up. Three steps that will ensure your data is performing at peak and safe from harm.