
MusicMaster Blog
Export & Import Your Clocks! posted on October 2nd, 2023
by Vicky James
Last time we connected I shared with you a How-To on cleaning up your clocks. Well, this time around I wanted to take that discussion a bit further. I had a client reach out because he was working on creating a new HOT AC format but was totally bummed…. Why? This guy absolutely loved the clocks that he’d created from his Mainstream Station, which included the lognotes and traffic breaks that would be literally the same in the new station with only a few modifications.
There were a couple of ways that he could’ve done this. Had he cloned the old database and wiped it clean, all of the work he’d done in the new database would essentially be lost. So I suggested he use the Export and Import Clocks feature, which was totally unbeknownst to him, and we were able to save his work!
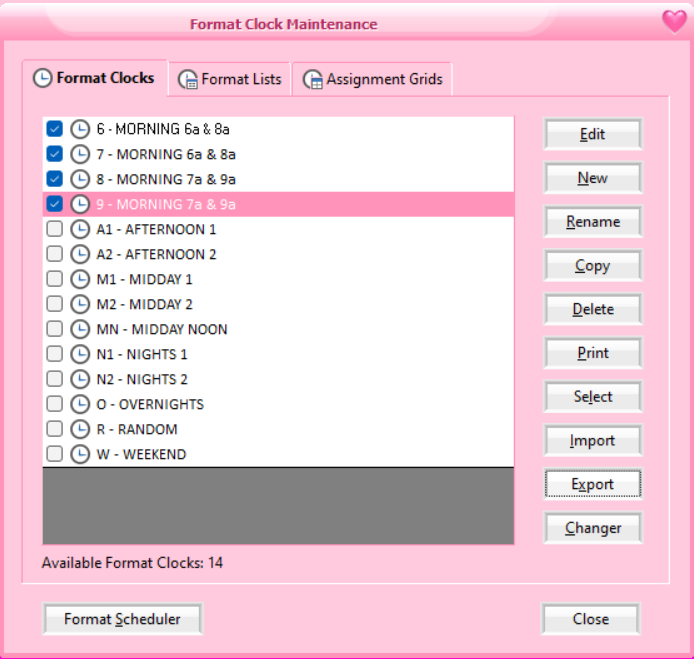
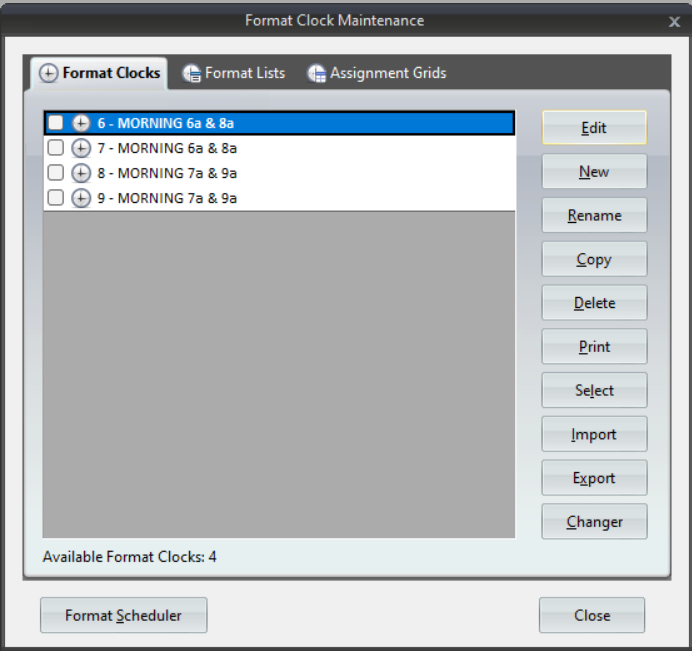
Let’s navigate to the Clock icon in the toolbar, which opens the Format Clock Maintenance panel.
![]()
Here you will select the clocks that you want to export.
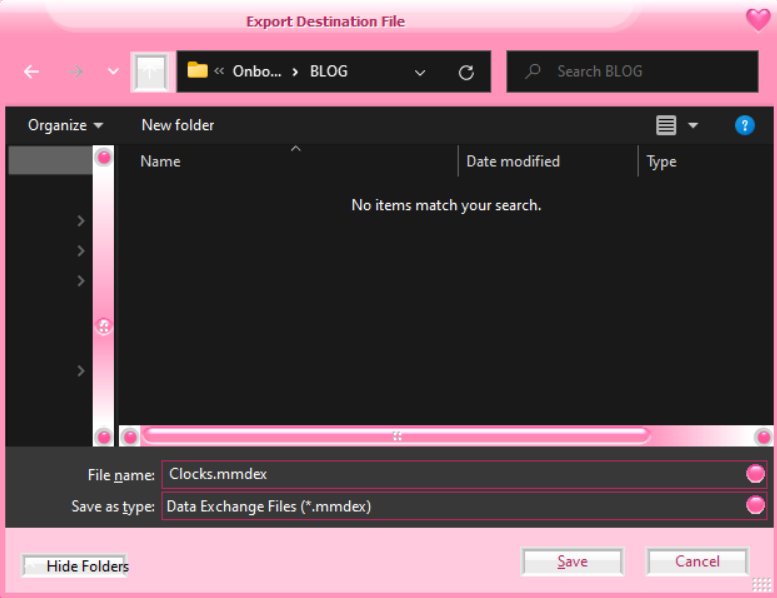
Set the destination to Save the exported clocks to.
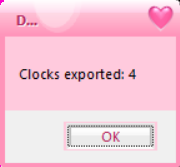
Once they are saved, the number of clocks exported will confirm.
Now let’s open the database that you would like to Import the Clocks into.
Once open, let’s go back to the Clock icon to again open up Format Clock Maintenance.
This time, click Import.

Now, you will click on the gray icon to navigate to the location of the saved 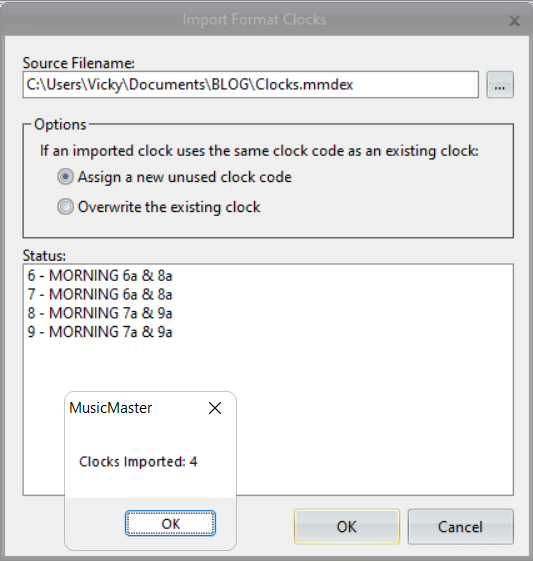 Exported Clocks.
In this case, I assigned a New Unused Clock Code since I didn’t have any clocks in this database yet, but you can also overwrite existing clock codes if you want.
Once you select OK, the clocks will be imported into the database as seen in the image below, and you can move forward in making the modifications needed to the clocks.
If you have any further questions about how to Export or Import Clocks in MusicMaster, contact your Music Scheduling Consultant for more in-depth guidance!
How MusicMaster Oldies Works posted on August 21st, 2023
How to Make 56,000 Oldies Sound Like a 590-Song Format
by Joe Knapp – Founder/President, MusicMaster
Listen to MusicMaster Oldies, streaming now on Live365, TuneIn, and iHeart, and you’ll hear something that sounds like a tight-formatted oldies format. But listen long enough and you will hear over 56,000 songs. How long do you have to listen to hear them all? Maybe ten years.
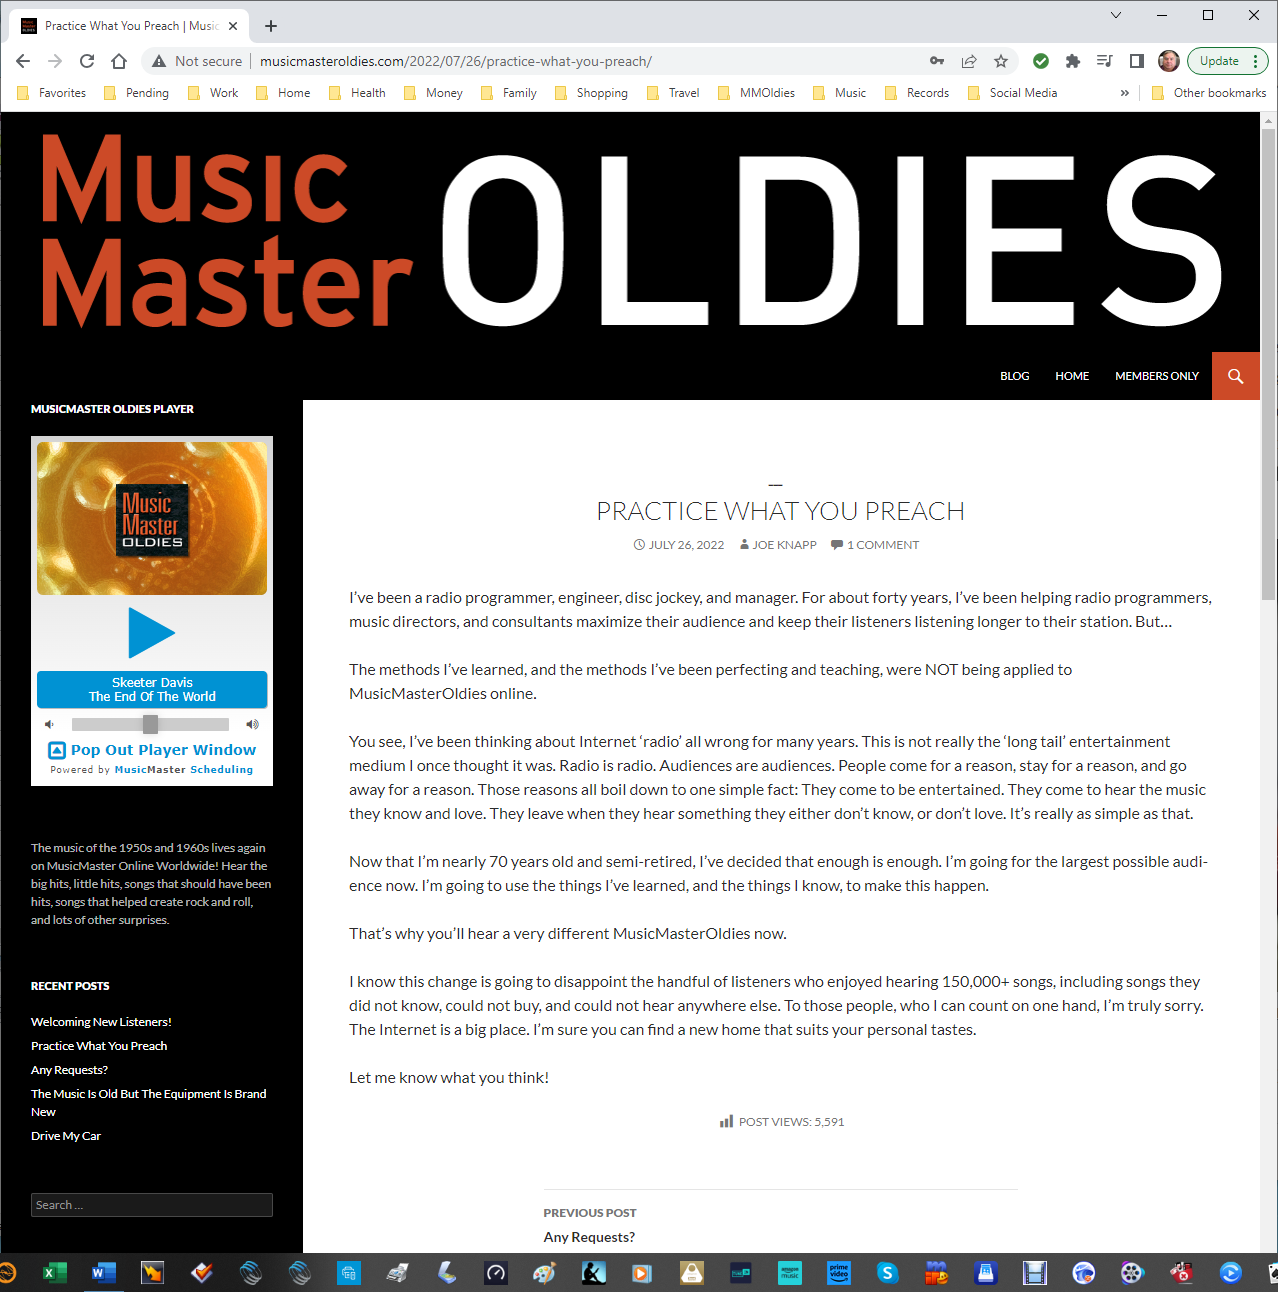
You can also hear it using the pop-out player on the MusicMaster Oldies Blog.
There are about 2,500 average listeners (and growing) and each of them listens for an average of one hour. The concept is based on a blend of philosophies. Terrestrial radio stations build cume by playing only the hits. Internet streams often go the “long tail” route and play everything under the sun. MusicMaster Oldies plays only the hits, but occasionally blends in one of those deeper cuts using imaging to turn them into special features.
Here’s how it works.
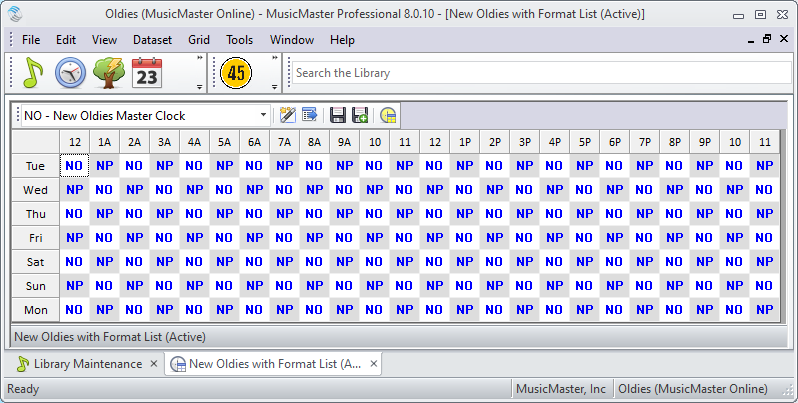
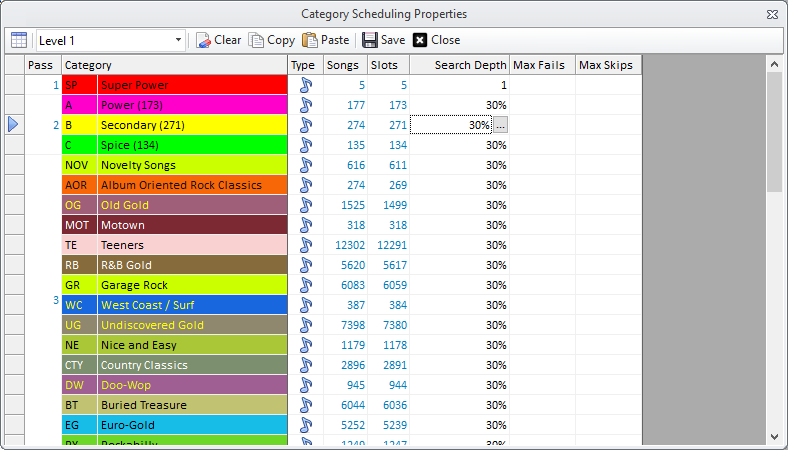
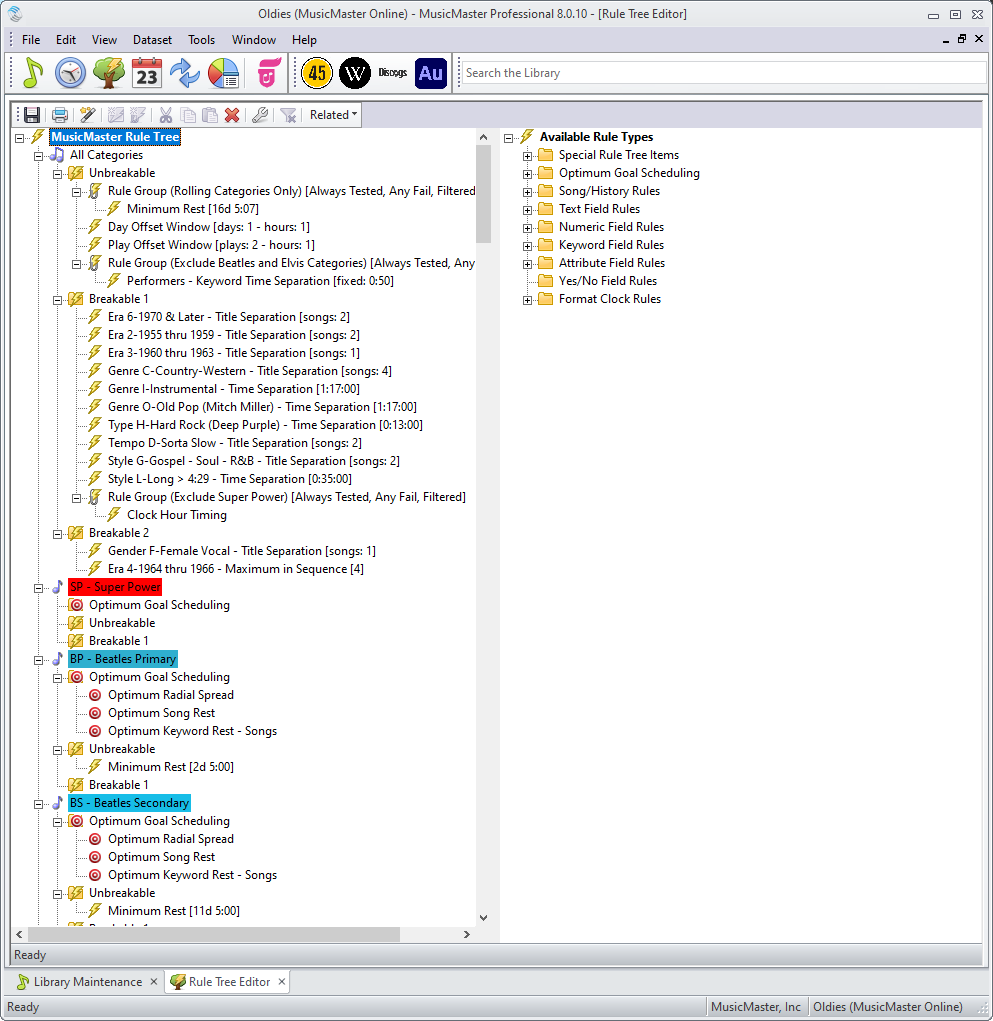
There are actually 591 songs in the active rotation, excluding songs by the Beatles and Elvis.
There are five songs in a Super Power category and you’ll hear one of them every hour. That’s five-hour rotation. These are specially selected “core” songs that are ultra-familiar and timeless music. Using Auto-Platooning, one of these songs is replaced every Sunday with the most rested song of the same type from the A-Power category. This keeps things tight, but fresh. It takes five weeks to replace all five songs, and just under two years to cycle all the “core” songs from A-Power into this SP-Super Power category.
The A-Power category has 173 cream-of-the-crop oldies from 1955-1973 and we play ten of them every hour. That’s a 17-hour turnover. 94 of these songs are marked as “core” and the other 83 are not. Every day, using Auto-Platooning, three of the non-core songs that have played the most are replaced with three from the AX – Resting A category that have rested the longest. Each non-core song rests for about three months before swinging back into action. The core songs never rest.
The B-Secondary category contains 274 songs and we play seven of them every hour. That’s a 1-day 15-hour turnover. Ten of the most played songs are swapped with ten from the BX – Resting B category that have been resting the longest. It takes about six months to cycle all these songs in and out of rest. You can barely notice these swaps because they happen very gradually!
The C-Spice category contains 134 songs, and we play one per hour. That’s a 5-day 14-hour turnover. Ten of these songs are also swapped with the most rested songs in the CX – Resting C category every day. It takes about six months for all of them to swap in and out of active rotation.
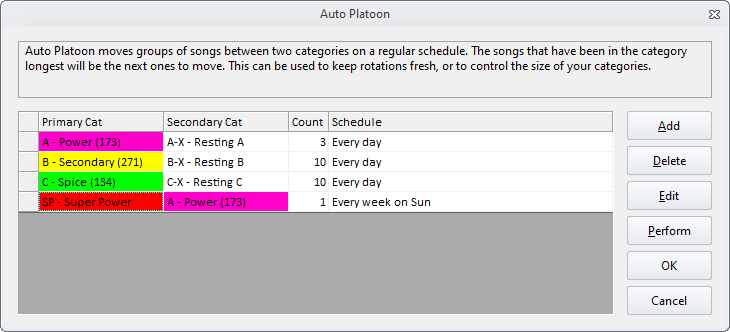

The three “rest” categories contain 237 (for A), 1324 (for B), and 1689 (for C) songs.
Here’s an example of songs you might hear in each category:
- A Core: Association – Along Comes Mary
- A Non-Core: Bee Gees – I’ve Gotta Get A Message To You
- B: Beach Boys – Good Vibrations
- C: Alice Cooper – Elected
The Beatles and Elvis have a ton of material and their familiarity and mass appeal make their songs somewhat interchangeable.
There are two Beatles and Elvis categories, Primary and Secondary, that alternate every hour. That’s a total of four categories. In each hour you’ll hear one from a Primary and one from a Secondary. There are 67 songs in the Beatles Primary (5-days 14-hours) and 274 songs in the Beatles Secondary (22-days 19-hours). There are 45 songs in the Elvis Primary (3-days 17-hours) and 239 songs in the Elvis Secondary (19-days 21-hours).
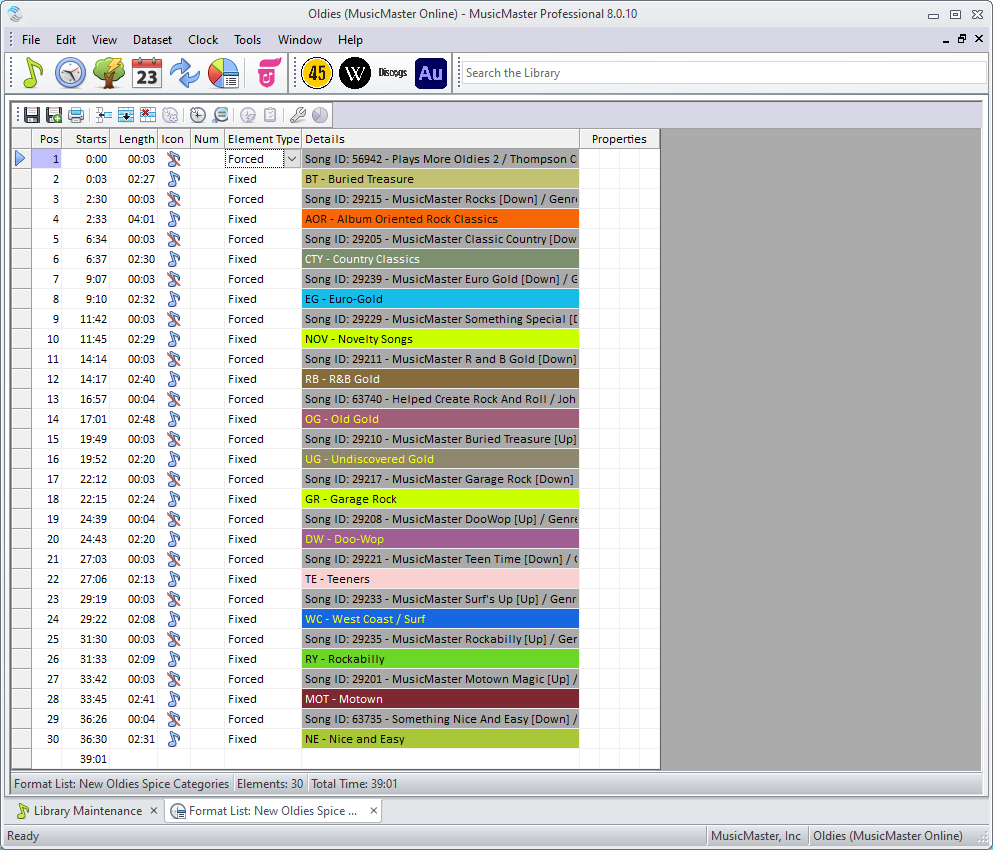
But where are the other 55,000 plus songs? Good question! They’re in separate categories that rotate with associated imaging in a Format List. Only one of these categories is called for every hour, and it takes 15 hours to hear just one song from each. Here are the names of these specialty categories and an example of what’s in them:
- Buried Treasure: Beach Boys – Wendy
- Undiscovered Gold: Bob Dylan – Highway 61 Revisited
- Euro-Gold: Adam Faith – Cheryl’s Going Home
- Doo-Wop: Herb Lance and the Classics – Blue Moon
- Garage Rock: Next Five – Little Black Egg
- Teeners: Ginny Arnell – I Wish I Knew What Dress To Wear
- West Coast-Surf: Lively Ones – Pipeline
- Rock Classics: Jimi Hendrix – Fire
- R&B Gold: Bobby Bland – Call On Me
- Motown: Marvin Gaye – Stubborn Kind Of Fellow
- Rockabilly: Carl Perkins – Pink Pedal Pushers
- Country Classics: George Jones – White Lightning
- Nice and Easy: Frank Sinatra – The Lady Is A Tramp
- Old Gold: Doris Day – A Bushel And A Peck
- Novelty Songs: Playmates – Beep Beep
There are only two Format Clocks that alternate every other hour, just to flip-flop those Beatles and Elvis categories. Here’s what one of them looks like:
- Station ID
- SP – Super Power
- B – Secondary
- A – Power
- C – Spice
- A – Power
- BS – Beatles Secondary (or Power)
- A – Power
- B – Secondary
- A – Power
- B – Secondary
- A – Power
- B – Secondary
- A – Power
- Format List: New Oldies Spice Categories (Two elements, imaging first, then rotating through:)
- BT – Buried Treasure
- AOR – Rock Classics
- CTY – Country Classics
- EG – Euro-Gold
- NOV – Novelty Songs
- RB – R&B Gold
- OG – Old Gold
- UG – Undiscovered Gold
- GR – Garage Rock
- DW – Doo-Wop
- TE – Teeners
- WC – West Coast / Surf
- RY – Rockabilly
- MOT – Motown
- NE – Nice and Easy
- A – Power
- B – Secondary
- A – Power
- EP – Elvis Primary (or Secondary)
- A – Power
- B – Secondary
- A – Power
- B – Secondary
- Hour Timing: 59:40 – 60:20
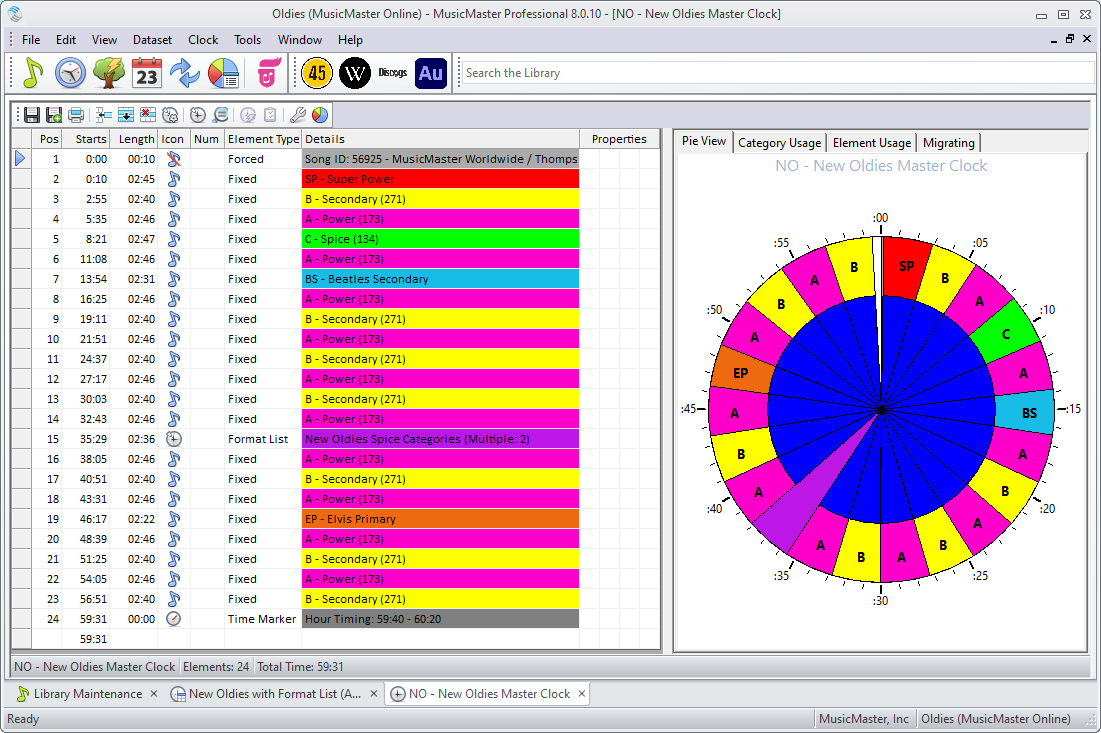
Each clock ends with an Hour Timing marker and an Hour Timing rule is applied to all categories. This keeps each hour within plus or minus 20 seconds of 60 minutes. I run Ready Check before exporting to make sure each day isn’t over or under scheduled. That never happens!
There are a few other tricks hidden under the hood. When I schedule music, I do one week at a time using ganged pass orders and scheduling just the SP-Super Power category first for the entire session. Then I run a second pass to schedule everything else, this time scheduling each hour before going on to the next hour. The A, B, and C categories are scheduled first, then all the others. There are never any unscheduled positions, and log editing is never required. It takes about an hour to schedule each week.
The rules are very simple because I lean on Optimum Goal Scheduling to do most of the heavy lifting.

Of course, this same concept should work for just about any gold-based format if you dare to try it!
If anyone has any suggestions for me that might improve things a bit, please let me know. Just don’t suggest that I play fewer songs! This is still a work in progress as I add even more songs to the specialty categories and remove songs that just weren’t very good (probably payola adds).
Let’s Get Spicy! Proportional Elements posted on July 30th, 2023
By Chris Hulsether
You want to get a little spicy with your playlist, but need to control that spice so everything balances well. Just like balancing the flavors of a great street taco: not too spicy, but enough spice to know it’s there. On one hand, you can use the Random element, but it is random and will schedule any of your selected categories, with no rhyme or reason to what categories get scheduled. Or you can use Format List elements, but unless you do a lot of different patterns the same pattern can get predictable.
How about Proportional elements? This can give you a little spice and a way to control it!
I would recommend this for gold formats or gold categories, if you have a few different ones to choose from.
Today’s country stations and even some CHR’s are starting to spike in more and more “Old” Gold into the playlist, and I am all about it! You get that occasional Garth Brooks “Friends in Low Places” that pops up out of nowhere. Or a classic Britney Spears song for that CHR.
This is the way you can use the Proportional element. In my example, I set it so that 80% of the time, you get a familiar song from Power Gold. But 20% of the time, you can have it go to a “Throwback” Category where you will have an older Garth, George Strait or Alan Jackson song pop up. If you add this once or twice in your clocks all day, you will sometimes get that random throwback in your day that gives that “Oh Wow I haven’t heard that one in forever” feel to your station. It also won’t be predictable when it schedules, and you control what that proportion is so it’s not too much or too little.
So how is it done?
Take a clock and change an Element position and make it Proportional.

You set the percentages in the Element Properties. I have a 4 to 1 ratio meaning 80% of the time it will be Power Gold (PG), 20% Uber Gold (UBG). You can use whatever ratio you like and use as many categories as possible that you want in one element.

Now, this doesn’t mean that you’ll always hear four PGs in this position and then a UBG. Rather, over the course of time, you’ll have a 4:1 ratio of PG:UBG in that position. You could get five or more PGs before a UBG comes into that clock position. But, over time, that requested ratio would be realized.
Over time, this will schedule that random throwback song in different places and different times based on your clock setup, and the rules for that random category will still apply, just like any other element.
You can use the History Browser and see how many “Throwback” songs scheduled and see the different hours they are popping up, so you can tell if it’s too spicy or if it needs a little more.
Save Time with the Clock Mass Change Feature! posted on March 27th, 2023
by Vicky James
I know the thought of considering clock changes can be just exhausting when you likely have several clocks, which then makes it an even more of a tedious project!
Well, what if I told you that making a mass change to your clocks can take a matter of moments!
It can! Allow me to guide you through this quick and simple “How To” on making a mass change in your clocks.
Before beginning any changes to your database we ALWAYS recommend making a backup, which is found in the Tools tab.
Now, let’s change your clocks!
You can launch the feature using the Clock Icon on the main toolbar.
If you are already working in a single clock, you can also find the Mass Change Clock Elements icon here:

Note that if you use this method, you are given option to mass change elements just within the active clock you have open, or on all of your clocks.
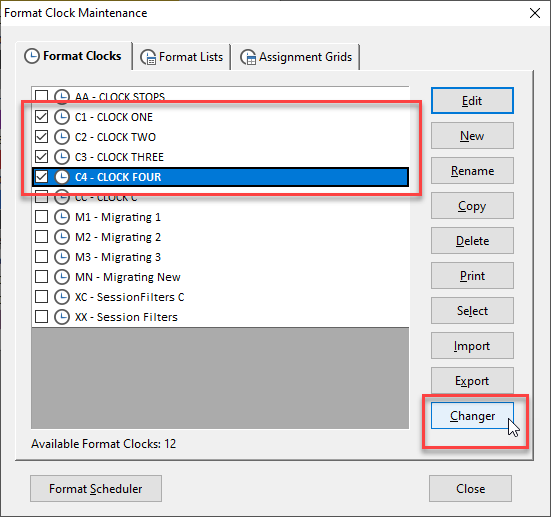
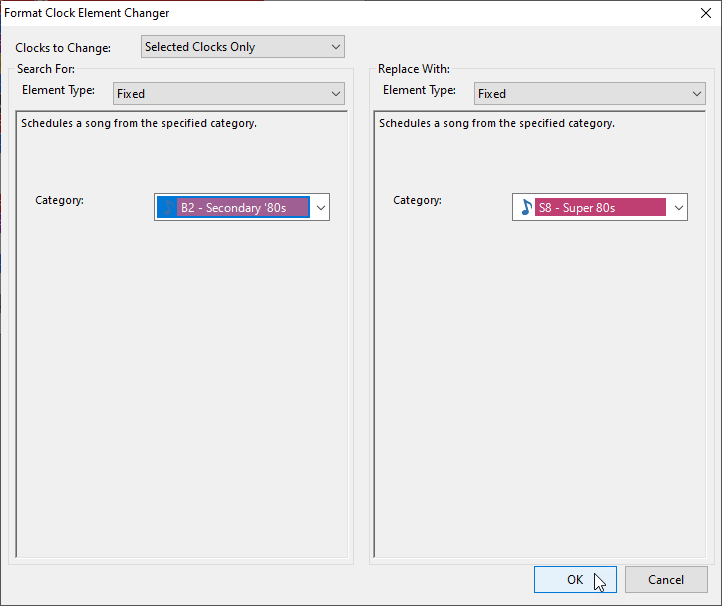
But if you want to change several (but not ALL clocks) at once, instead of opening up a single clock first, you should click on the Clock icon on the main toolbar. Then, checkbox the clocks you want to edit and use the Changer button at the bottom of the panel.
Some examples of when you may want to edit multiple clocks at once is swapping in a different category, picking a new song ID for a forced element used in multiple hours, or plugging in a new format list you’ve created.
In my example, I plan to swap my Secondary 80’s category for my new Super 80s category in four of my clocks at once. I’ll set things up as in the image above, by checking the four clocks and clicking Changer.
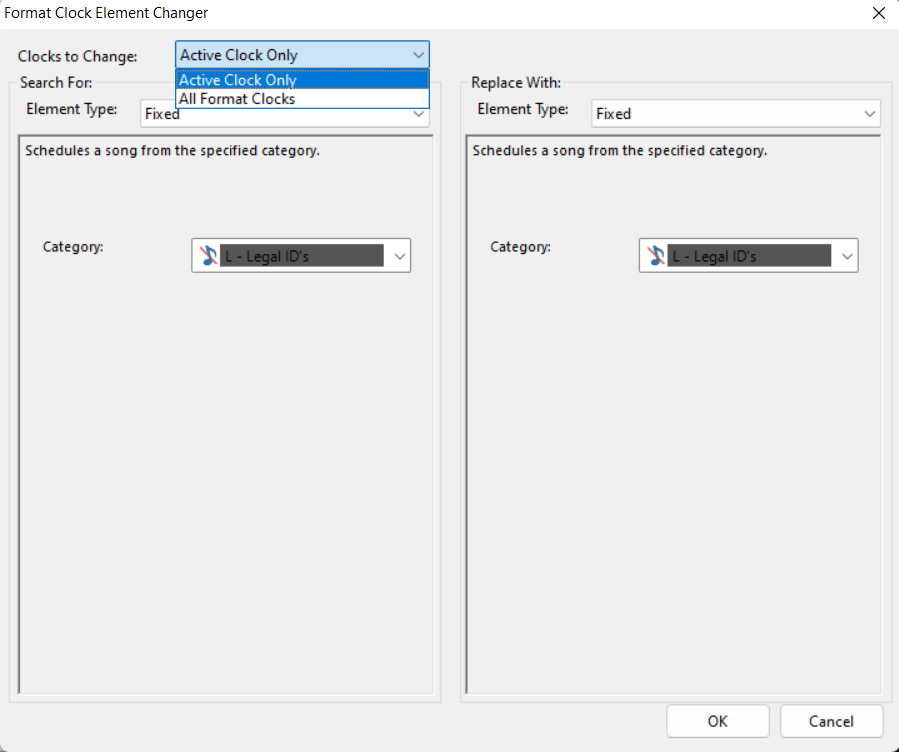
When the Changer opens, you can see the split screen gives you options to select the Element Type that you would like to “Search For:” (on the left), and “Replace With:” (on the right).
You can change use the Changer to edit properties for a selected clock element, or you can change an existing Element Type to another Element Type.
In my example, I’ll set it up so that any Fixed position set to the Secondary 80s category is replaced with a Fixed position that calls for the category Super 80s, as below.
Another gentle reminder, make certain you have a verifiable database backup before proceeding.
When you’ve completed the task, this notification will appear indicating the Total clock changes.

Note that if you had your clocks open, you would have to save them each before closing them to apply the changes. But if your clocks were closed already, you don’t need to worry about this.
Finally, check the clock changes to be sure that this is what you were looking for, and that all of the elements you expected to change did in fact change. If they didn’t, you may have needed to tweak the Properties to find the right match.
Keep in mind, the Properties available in the “Search for” section of the Changer help you target which exactly which elements will be replaced. For example, you might have multiple Lognotes with the same text, but using the Properties, you can target those with a specific runtime, or those that do or don’t have a sweep marker.
Or, for another example, you might have many different instances of Proportional, Combo or Migrating Position elements in the same clock that each call for different categories. You can use the properties to configure which instance want the Mass Changer to look for.
A handy trick, if you select the element in the clock itself before clicking the Mass Changer button, it will open up with the properties already set to match that selected element. In the example below, you can see that my clock has several different flavors of a Proportional Element, but when I open the Mass Changer, you can see I’m only targeting the one that uses a ratio of 40% A3 and 60% 60s category (position 11) and not the other Proportional elements at positions 10 and 17.
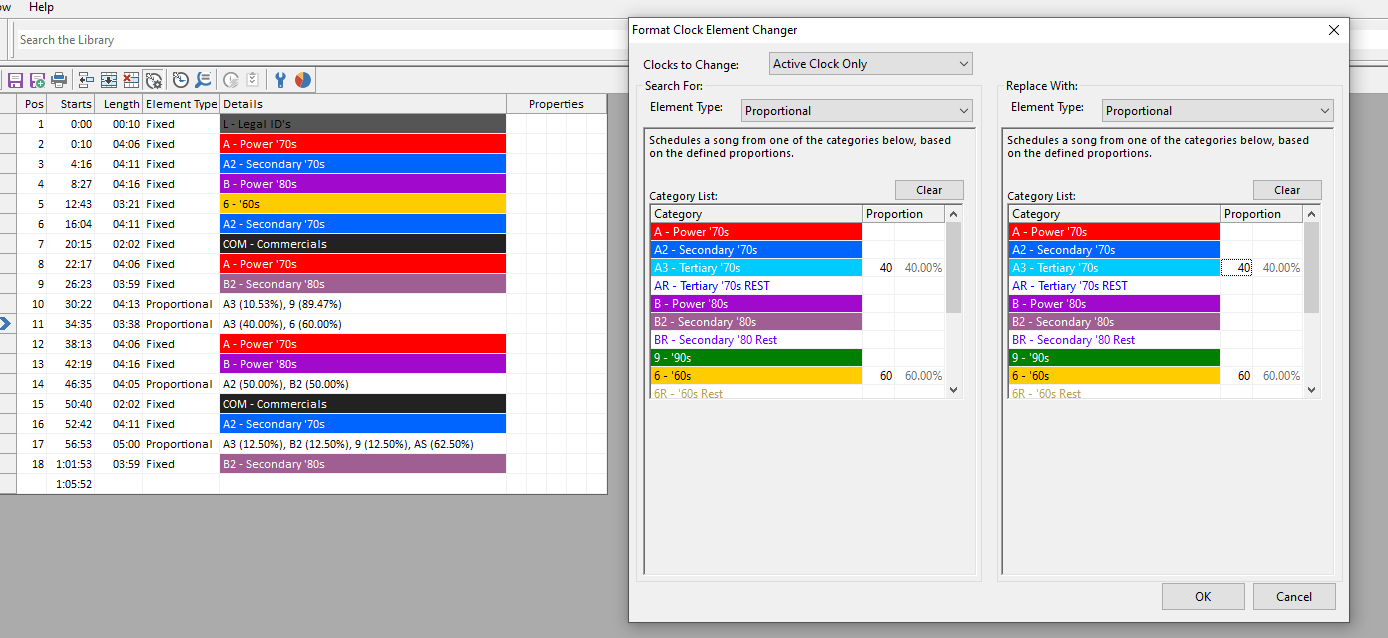
It’s also important to remember that any clock filters you have on targeted positions will NOT be considered when looking for elements that match the “Search For” criteria. In other words, elements with the selected element type and properties will be targeted for replacement, whether one of them has a filter on it or not.
Should need any further support, you can always reach out to your dedicated Music Scheduling Consultant!
Migrating Position Wizard and Flex Rules Analysis posted on March 7th, 2022
By Laurie Knapp
In Version 8, it’s easier than ever to use Migrating Positions with Flex Rules. There’s a new wizard for adding Migrating Positions, a Pattern Builder which shows you sample clock assignments, and more display information to indicate potentially problematic Flex Rules settings.
About Migrating Positions
Migrating Positions are not new to MusicMaster Pro Version 8, but in case you have never used them before, here is an overview of how they work.
Use the Info Bar next time you’re building clocks! posted on September 23rd, 2019
By Brian Wheeler
Building clocks is a task that most MusicMaster users visit infrequently. Many users will create a set of clocks and use them for long periods of time with little, if any, change. Other users may require more frequent changes but may not feel very efficient in this process. Are you maximizing the tools at your disposal?
There are many features in MusicMaster that make clock building and tweaking easier, but for now I’m going to focus on the Info Bar. The Info Bar is typically docked on the left side of your MusicMaster program if you have it visible at all. If you don’t have it visible, you can go to View, then select Info Bar to see all that the Info Bar has to offer.
The first thing you’ll likely notice is the list of your music and non-music categories from top to bottom. Not only can you click on these categories to get a quick view of each category’s contents, but you can also drag these categories into a clock that you are building. You can drag and drop an entire hour’s worth of music in a matter of seconds using the Info Bar.

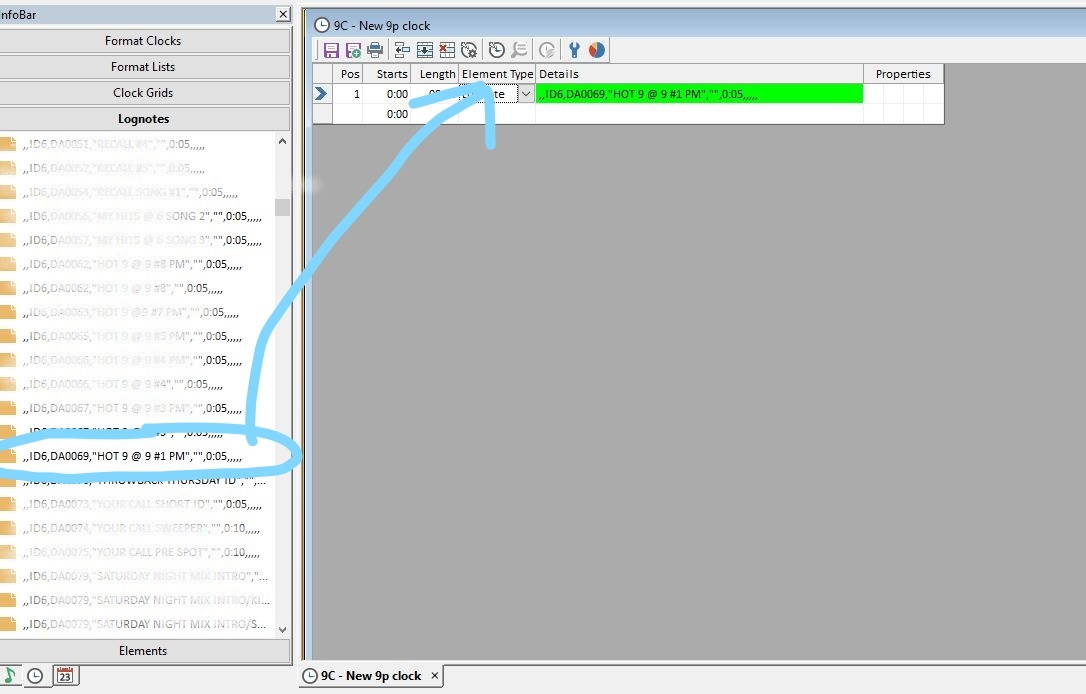
You can also drag in lognotes. those commands for your playback system that you so carefully typed into your clocks are all retained under the clock tab at the bottom of the Info Bar. Click on the Clock tab, then select the ‘Lognotes’ header. There is your entire list of carefully created lognotes. You can drag and drop those into your clocks, too! No sense in having to type them all out again.
Also note in Version 7, the new Elements Tab in your InfoBar allows you to drag clock elements directly into place.

Using these tools, plus other great tools like the ‘clone’ feature in the clocks (use the toolbar or context menu option) can make the arduous task of creating or modifying clocks into a breeze.
If you’d like more tips and tricks to minimize your clock building/rebuilding time, give your MusicMaster Scheduling Consultant a call and we’ll be happy to show you all kinds of time-saving features.
Clocks: Quick Entry posted on March 25th, 2019
By Paul Ziino
MusicMaster Version 7 offers a new way to edit clocks. Introducing Quick Entry!
Open a clock or create a new one, then click the wrench icon. Here you have two columns of options: Show/Hide Elements and Show/Hide Columns. If you don’t want to view specific element types you can un-check them. For this exercise we’re going to add a check to Quick Entry under the Show/Hide Columns. If you want to keep these settings, check the box to Save as Default Settings.
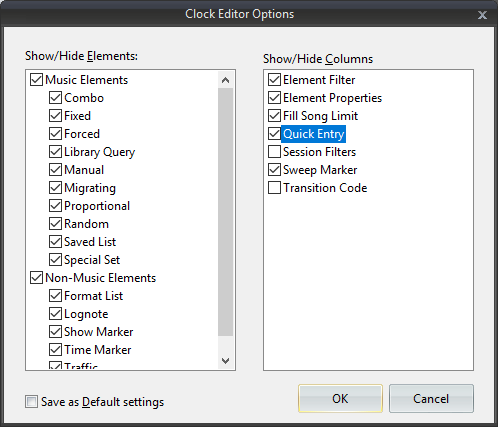
Each element type has a keyboard shortcut associated with it now. You can enter that shortcut in the QuickEntry column of your clock editor.
Customize the look of your clocks in Version 7 posted on December 3rd, 2018
By Marianne Burkett
As I’m digging deeper into Version 7, I’m seeing things I’ve always dreamed of as a programmer.
First go to Tools/Options/Display Colors and set up this feature that has been in the program for some time. You can select colors you’d like to see for various elements in the clocks. In the capture below, I made Stopsets Deep Red and Lognotes Pale Yellow.
When building clocks, I love our “Pie” view. If you color your categories with various colors, it makes it simple to distribute the categories evenly through the clock.
Check out the default view in Pies which we’ve always had.
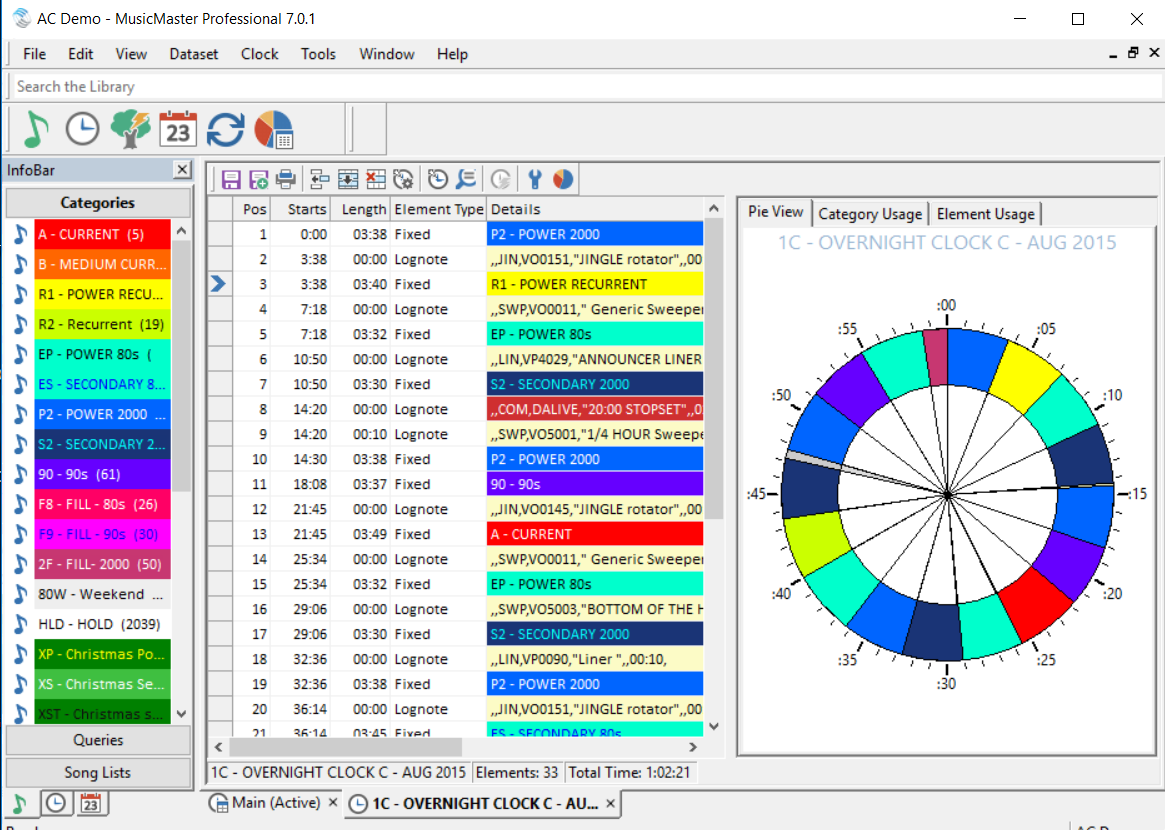
In Version 7, with a quick visit to Tools/Options/Additional Properties you can put the number “1” in “PieClockLabels” in the Clocks Section, and you get category code and element information in the pie view as well.
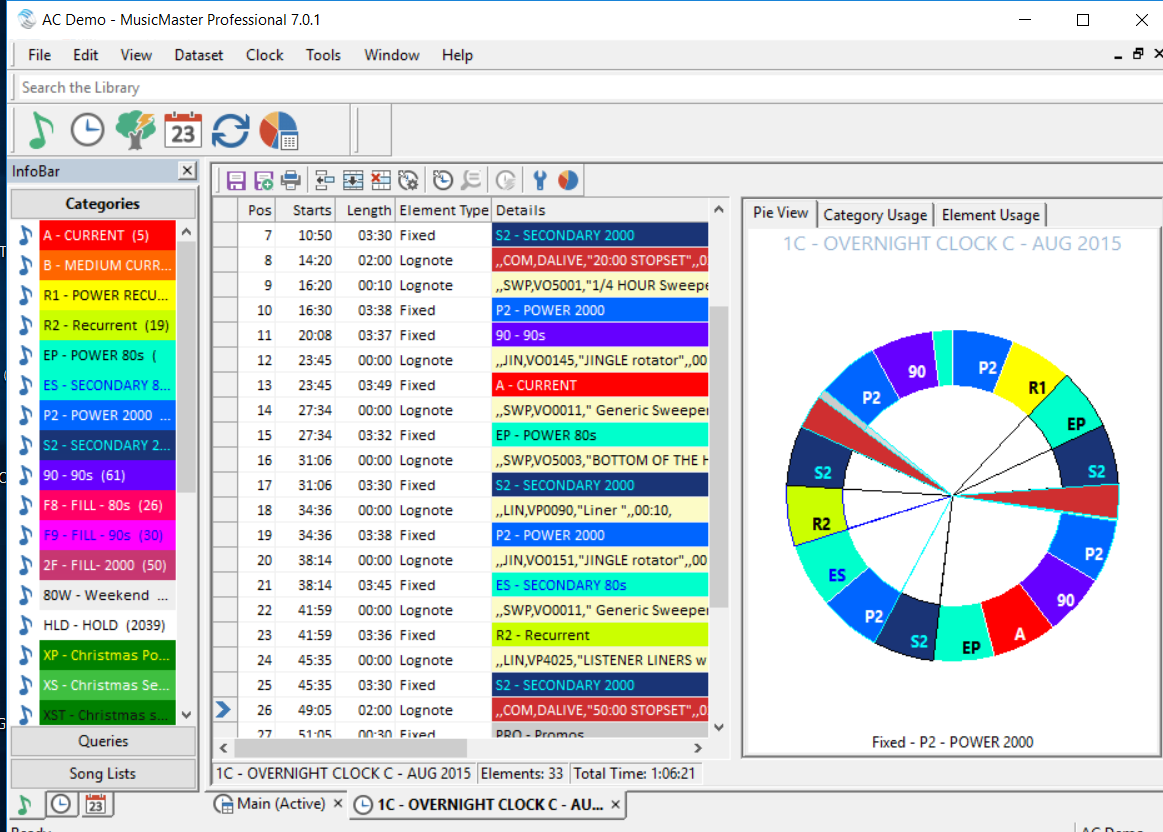
When you hover over anything in the pie you also get details about lognotes, music and non music descriptions below the pie. In the sample screen shot, my cursor was on a P2 Power 2000 category.
If you made a lot of clock changes and use the pie, this new feature can help in making sure they’re spaced out correctly.
If you’d like the video tour of new core features in Version 7, click the link below.
https://www.musicmaster.com/version7.php
Any questions, call your Music Scheduling Consultant!
Custom Rules for Specialty Clocks posted on May 21st, 2018
By Marianne Burkett
So, you have a 5’oclock Free Ride feature and you want specific rules to fit the hour.
You want no slow songs, no buzz killer songs, right? Just music that will pick up the spirits of those stuck in the car, in rush hour traffic.
With MusicMaster, if there’s a will there’s a way.
Let’s go to the Rule Tree and set up some custom rules for your 5pm clock(s)!
Go to: Dataset/Rule Tree or just click on the Lightning Bolt Icon. At the top right-hand side of the Rule Tree in Available Rule Types is the folder “Special Rule Tree Items”. Inside that folder is “Rule Group”.
Pull the Rule Group over to the Unbreakable All Categories folder. The Rule Group properties will open up once you’ve dropped it in the folder.
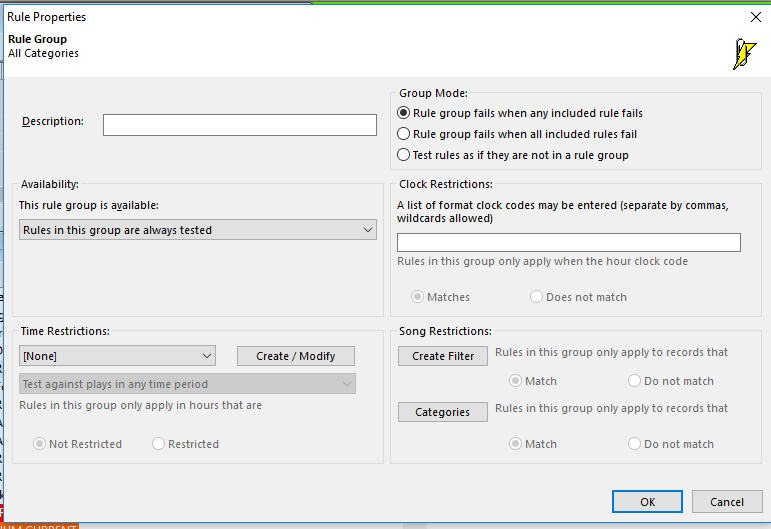
You only have a few clocks assigned to your 5pm hour so this will be quick.
First fill out the “Description” field and give your rule group a name, then move over to “Group Mode” and select “Test Rules as if they’re not in a group”. (When you use the recap report, you’ll be able to see what rules in the rule group are failing or having difficulty if you chose this option.)
Next, go to the “Clock Restrictions” section and list the clocks you want to adhere to your specific set of rules for the specialty show. Be sure to separate the specific clock codes with a comma!

Click okay and your Rule Group is ready to fill up with specific rules for the show.
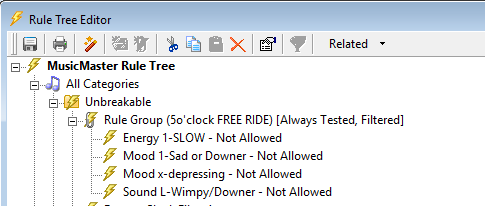
Drag and drop your rules over the title of the Rule Group and you should see the lightning bolt next to the rule, indent a bit. If the lightning bolt isn’t indented, it’s not yet in the rule group. If that’s the case, drag it over the name of the Rule Group and it should tuck in for you.
Save your Rule Tree and you are done! How easy was that?
The beauty of this is if your specialty show ever moves to a different time, the rules will just follow the clocks to the new time.
If you have any questions, please contact MusicMaster Support.
Migrating Positions to Mix Things Up posted on November 27th, 2017
By Paul Ziino
A client posed the following scenario.
I am only using one clock 24/7. The categories always show up in the same place every hour. As such, those items at the end of the hour aren’t getting played very often—they’re dropped due to time updates in automation. I play primarily 80s pop, but have four positions per hour that are 90s, 70s pop, 80s rock, and 70s rock. Right now, that 80s rock drops almost every hour as it’s the last position. What can I do without rebuilding everything else that is working so well?
We looked at his clock. He has things spread out very well, so anything that strays from that core 80s pop sound is surrounded by that core sound. He still wanted one of each of those categories scheduled in the hour, but maybe he didn’t always need it to be the 80s rock that gets dropped.
So, what did we do? Migrating Positions! We turned those four clock positions that called for the 80s Rock, 70s Pop, 70s Rock, and 90s into migrating positions. Now MusicMaster knows where in the hour to schedule those four items, but it can move them around making their specific placement different one hour to the next.
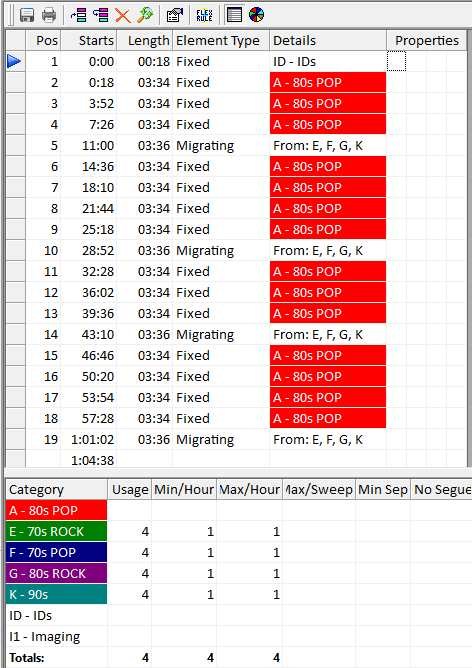
By looking at the clock and Flex Rules, you can see that we have four positions in the hour (Usage column in the Flex Rules) and that one of each of those positions must come from each of those four categories (Min/Hour and Max/Hour in Flex Rules). We let MusicMaster decide which position will come from each, and the result is the same rotation overall, but different placement within the hour. Overall, it’s an easy way to move things around and keep it interesting without the need to create a bunch of different clocks.
If you have questions on this or any other MusicMaster topic, make sure to reach out to your MusicMaster Scheduling Consultant.